Thursday, July 31, 2014

Importing Test Questions Into Moodle

We are often asked by instructors, "How do I import my test questions into Moodle?"

One easy method is to use a text‐based editor to compose test questions that can be easily imported into Moodle. Proper syntax and file structure is critical for a successful file upload. We have developed two basic processes to quickly and efficiently import question banks into your Moodle shell:

For  true/false and multiple choice questions, we recommend the "Aiken" format. It is simple, easy, and fast. You can do it yourself! Read more here.

For question types beyond true/false and multiple choice (matching, multiple response, fill-in-the-blank, etc.), we utilize a tool called Respondus (don't buy it; we have it). If you deliver a Microsoft Word file in the proper syntax to us, we can take it from there. Read more here. Be sure to include:


  1. Properly-formatted Word file
  2. Link to your Moodle course shell
  3. Question categories ("Chapter 1," "Week 1," or other naming conventions)
  4. Whether you also want quizzes created as we upload your questions (including default settings)


Please get this information to us with as much lead time before a term begins as possible, because we are heavily involved with student access support work during the week before, and the first two weeks of each term.

Tuesday, July 22, 2014

Low Digital Fluency of Faculty

From the 2014 NMC Horizon Report: 2014 Higher Education Edition (pp 22-23):

"Faculty training still does not acknowledge the fact that digital media literacy continues its rise in importance as a key skill in every discipline and profession. Despite the widespread agreement on the importance of digital media literacy, training in the supporting skills and techniques is rare in teacher education and non-existent in the preparation of faculty. As lecturers and professors begin to realize that they are limiting their students by not helping them to develop and use digital media literacy skills across the curriculum, the lack of formal training is being offset through professional development or informal learning, but we are far from seeing digital media literacy as a norm. This challenge is exacerbated by the fact that digital literacy is less about tools and more about thinking, and thus skills and standards based on tools and platforms have proven to be somewhat ephemeral."

Monday, June 30, 2014

The Beginner’s Guide To Google In The Classroom

I'm really happy to see that Oregon was the first state to offer Google Apps for Education in all K-12 classrooms, and that the college where I work was ahead of the curve.

Read more here.

Wednesday, June 11, 2014

Moodle Grade Calculation Issue

We've seen a number of issues in various Moodle course shells where the grades don't seem to be calculating correctly. Most of the time, an Instructor has previously overwritten a grade, which causes the automatic grade calculation to get thrown off. Here is a solution Eric discovered:


1. Click "Grades" in your course "Settings" block:


2. Turn editing on in the upper right-hand corner:


3. View the Grader Report:


4. Scroll to the right to the column for the grade item. Click on the "gear" icon for each student that the grade is highlighted:

5. When the student's "Edit grade" form pops up, uncheck the "Overridden" check mark and remove any comments:


6. Be sure to save changes, and then note the correctly calculated grade.

7. Lather, rinse and repeat!

Monday, April 21, 2014

Instructor Responsibility Sign

The other day, I noticed a sign mounted on the wall by the door inside a classroom:


It made me think of what an equivalent sign might look like for a Moodle course shell. How about this:


Thursday, April 3, 2014

Creating a Hyperlink in Moodle

This tutorial will help you create a clickable link in Moodle, utilizing the familiar text editor used by a large number of websites.

First, take a look at these two different ways of sharing a link in Moodle:


1. Here is a really interesting story I found:

http://news.nationalgeographic.com/news/2013/11/131121-boredom-personality-psychology-students-science/


-OR-

2. Here is a really interesting story I found.


As a web user, which would you rather see? Do you want to select all of the URL (I would call it a "link" but it's not a link), and then copy it, and then paste it into a browser address bar, and then press the "Enter" key on your keyboard, or would you rather click the link, and be directly to the web page?

It's really easy to give your readers the convenience of an actual link, rather than a text URL to copy & paste (imagine if that's all we ever saw on the web!). Let's avoid that whenever we can.

1. Here is the text editor you will see a zillion times in Moodle, and elsewhere:


2. Rather than pasting a link like this:


3. Make it easier for your readers by making the URL a clickable link. Type in the copy you want to become an active link, then select it:


4. I prefer to make it as obvious as possible that the text is a link by making it bold and underlined, but that's just a preference (two cursors - pretty cool, huh? Don't try it at home):


5. Here is the critical piece - click the "Insert/edit link" button:


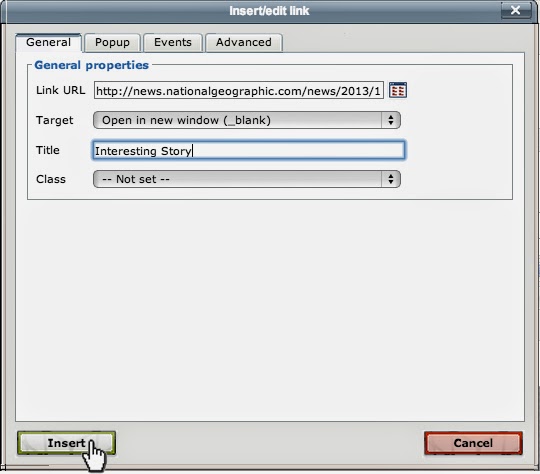
6. Paste the link to the page in the "Link URL" field. For pages outside of LBCC Moodle, we recommend setting the "Target" to "Open in new window." Input a Page Title, then click the "Insert" button: 


Now you have provided a live link to a web page that people can view with a single click!


Oh, here's that link to the interesting story in this tutorial.

Sharing a Google Doc With Specified & Unspecified People

When it comes to getting eyeballs onto a Google Doc (including Presentations and Spreadsheets), there are two main paths to follow: Publishing, and Sharing. See our tutorial on publishing a Google Doc here.

When you think of sharing a Google Doc, there are a lot more options and features, compared to the old email attachment method. I am writing this tutorial in the context of a student sharing a doc with their instructor and other classmates, but the concept can be easily applied to a number of office procedure scenarios where an online document needs to be efficiently shared among people. Also, this is just an overview, so be sure to explore the features and benefits of the options we don't cover here; there are some great tools there! Here goes:

1. When you are viewing the Google Doc in question, click the blue "Share" button in the upper right:


2. This brings up the "Share with others"dialog box. Click "Get shareable link"


3. Click the "Anyone at Linn-Benton Communit…" area, then click "More…" at the bottom of the dropdown menu:


4. "Anyone with the link" is a good way to share most docs in an LMS course. That won't require students to be logged in to their Google Apps for Ed account to view it.


Note that "Can view" is the default Access setting, but you can also choose to give people editing or commenting privilege. NOTE: "Can comment" is non-editing.


5. Click the "Save" button at the bottom, and the link will be ready to copy to the clipboard:


6. Paste that link into your Moodle course, email message, etc., and people will be able to access the live document!


Ok, now we will branch off a little to show how to share with a specified person(s). Take a look at the screenshot in step 2, the "Sharing settings" dialog. Here it is again, after clicking in the "Invite people" field:


When you start typing names in the field, note how people's names start to appear. Be sure to select the correct email address, as many employees have both a staff- and student-formatted account:


Decide among the various sending options, and click the blue "Send" button.


And that's how you share a Google Doc with specific people!

We would love to know how you share Google Docs, so feel free to share via a comment below!

Wednesday, April 2, 2014

Fix Your Broken Attendance Activity

In case you haven't noticed, the Attendance activity in our current version of Moodle is… well, it's not really broken, it just has numerous redundant session types. The most commonly used session types are:

Present
Late
Excused
Absent

You only need one each of those basic session types to use the Moodle Attendance activity, but most Instructors I have been working with shy away from it when they see all of the redundant (not to mention repetitive and extraneous) session types:


Ugh. Who would want to take the time to delete all but one each of the necessary "PLEA" session types? I'll tell ya who - ME! Want a copy of it to put into your own Moodle course? Okay, here you go, and here is how to put it into your course shell:


2. Log into your Moodle course.

3. Click "Restore" in the Settings block:


4. Browse for the "Attendance-PLEA.mbz" file you downloaded from the above link, and click the "Restore" button:


5. Make sure "Merge the backup course into this course" is selected, and click the "Continue" button below it:


6. Click the "Continue" and "Next" buttons on the next few screens…


7. … and then the "Perform restore" button.


8. When the process is complete (it should only take a few seconds), click the "Continue" button to be taken to your course shell:

9. You can now use the Attendance activity to track student attendance, with or without point value. You can also deploy the corresponding Attendance block:


There you have it - now you can document your students' attendance directly in Moodle!

Monday, March 31, 2014

Two Potential Auto-Enroll Sticking Points

So your students aren't auto-enrolled into your Moodle course shell yet? You have your CRN input into the "Settings" area in your Moodle course shell, and you also input the CRN into the LBCC Moodle CRN form. Heck, you even verified your entry on the verification page, and it all looks squared-away, but your students still aren't enrolled! What do you do?

We have seen two issues crop up occasionally that are both actually easy to fix:

1. You inadvertently inserted a space before or after the CRN in the "CRN" field in your Moodle course settings area:


That one is easy to fix by making sure only the five digits are in the field. Shortly after you fix it, your students should be auto-enrolled.

2. You haven't run that Moodle course shell since we transitioned to Moodle 2 in June 2103. This one is a little trickier to identify, but still well within your ability to diagnose and solve it.

First, click on "Enrolment methods"(we know; it's the British spelling) under "Users" in your course Settings block:


 Next, look to see if the eyeball is closed for "Conduit" (that's the name of our auto-enroll tool that talks between Banner and Moodle). If it's closed, click to open it:

That should wake up the auto-enrollment method, and give your students instant access to your Moodle course shell!

Of course, if neither of these solutions work, let us know. It may be that you accidentally input the wrong CRN into the CRN form, and/or (worse yet) the Multiple CRN Enrollment form - but that's set of issues altogether…

Lastly, and while we are talking about the CRN Form and Multiple CRN Enrollment form forms: check this out.

The CRN and Multiple Enrollment CRN Forms

The two forms serve distinct purposes. Please take a moment and read the info on each form before submitting them.

Please take care to input your CRN(s) precisely. Each mistake on the CRN Form costs us at least 15-20 minutes of staff time to fix, and a mistake on the Multiple CRN Enrollment form can take a lot longer, and can actually stall the auto-enroll process for a number of LBCC Moodle courses altogether, affecting dozens of instructors and hundreds of students.

Once you complete each form, take a moment to notice the verification links to each on the confirmation page. Taking a moment to doublecheck your work, and then letting us know immediately if there is any issue will save you you and your students a lot of hassle.

Tuesday, March 4, 2014

How to Publish a Google Doc in a Moodle Course


One of the best ways to publish eLearning content is via Google Docs, rather than as a page within your LMS (Learning Management System). This will allow you to keep all of your course content in one place (Google Drive), from which you can edit with no need to republish.
Step 1: From within a Google Doc you wish to publish in your Moodle course, click File > Publish to the web… (NOTE: not the “File” menu for the browser itself):
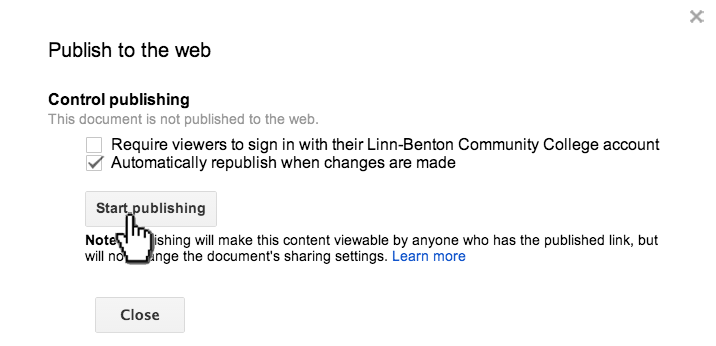
Step 2: In the “Publish to the web” dialog that appears, note the available checkboxes. We recommend leaving them both as-is. Click “Start publishing.”
Step 3: Click “OK.”
Step 4: In the “Publish to the web” dialog, click in the “Document link” field and copy the link to the clipboard.
Step 5: In your Moodle course, turn editing on:
and click  in the content block where you wish the link to appear.
Step 6: In the “Add an activity or resource” dialog box, select “URL,” then click the “Add” button:
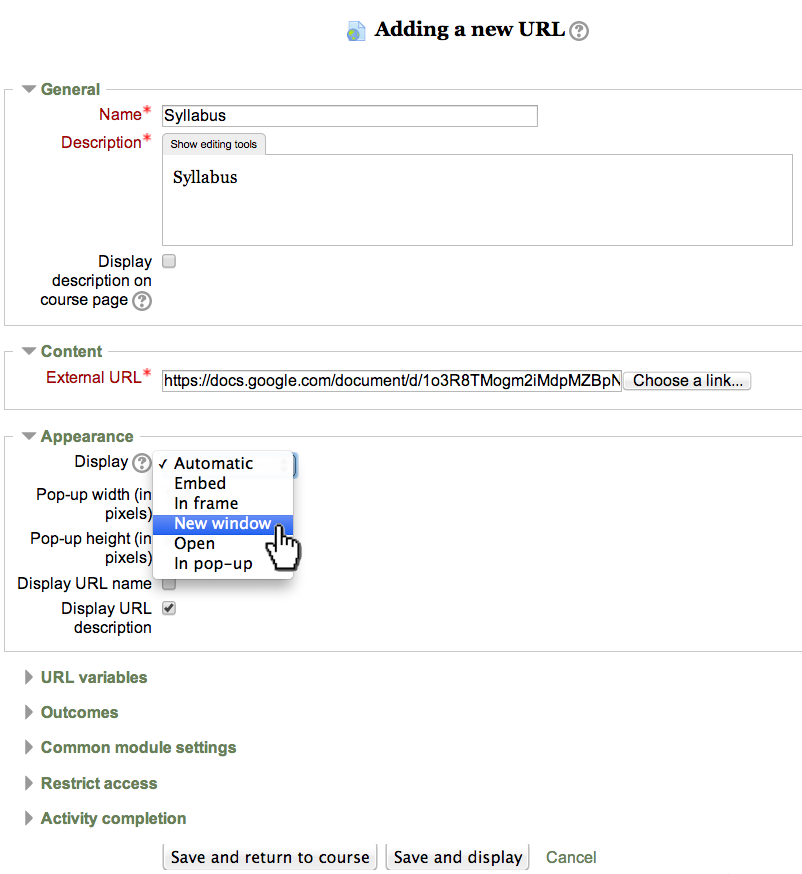
Step 7: This is the “Adding a new URL” page. Note that the field with asterisks are required. Also, we recommend indicating the link to appear in a new browser window. Make your inputs and selections, and click the “Save and return to course” button at the bottom.
Step 8: Locate your new link, and move it, if necessary (with the “” icon), then test it out by clicking the link. It should open in a new browser window or tab.
OPTIONAL: You can shorten the URL via bit.ly. The link for the published version of this Google Doc is: http://bit.ly/1hDp20U