Google Tasks is one of the lesser-used apps in the Google Apps suite, but it's a powerful app when you use it to combine and compliment the functionalities of various apps.
Showing posts with label google. Show all posts
Showing posts with label google. Show all posts
Friday, May 21, 2021


Tuesday, November 21, 2017
Thursday, March 30, 2017
The Moodle Calendar Export Issue

I'll boil it down here: You're taking 3 or 4 classes, each with specific due dates and times for various assignments, quizzes, forum posts, etc. That sounds pretty typical, right? What is also typical for students - especially lots of Community College students? Life getting in the way. They need the ability to see all of the events they need to do in the context of all of the things they want to do. If you have ever missed an important deadline because you got caught up in a fun, but less important activity, you know what I'm talking about. And with the easy mobility of cloud-based calendars on our smartphones, we really are running out of excuses. And no, the dog really didn't eat your homework, because we all use Google Docs, right?
Every time I visit this Moodle-Google Calendar project, I discover tiny glimpses of progress in Moodle, but no complete solution. One aspect I really wish would come about relates to the fact that the Moodle Calendar export still seems to relate only to a user account, with no option to tie to events within a Moodle course. From Moodle.org:
"Note that this may be more or less useful. The calendar will be relative to the Moodle user. That is, if the user who generates the URL is enrolled in several courses, it is this information that will appear in the calendar. There is no way (at this time) to generate a URL that only applies to one course."
Having that option would enable instructors to create Google (or other) calendars specific to their courses, without also including other events happening in other courses in which they are enrolled. It would also empower students to export course-specific calendars to their own Google calendar.
Isn't it time we had an "Events related to THIS course" selection?

Can we please get there, Moodle?
Tuesday, November 22, 2016
How To Copy A Google Drive Folder
You may know how to copy an individual Google Doc, but have you ever thought it might be useful to be able to copy an entire folder of Google Docs (and even subfolders, too!) in one fell swoop, rather than one at a time?
I have found two ways to do this, and I really don't have a strong preference for either. I would flip a coin and share only one here, but, given that neither of these processes is technically a Google tool, there is the possibility one or both may stop working in the future - sort of like "Labs" in Gmail: not officially supported, but use and enjoy it while you can.
So, up-front, here are two links for you to bookmark in your browser:
A. labnol.org/xcopy
B. http://tools.gappstips.com/drive/copy-folder/#
Here are the basic processes for both:
A:
1. Click the "A" link above. It will take you to a page that asks you to give the tool access to your Google Drive:

2. This will produce a pop-up:

3. You will be taken to a page that looks like this:

4. It's probably going to be easier to browse for the folder in your Google Drive if you click the "Select Folder" button. This produces (yet another!) pop-up, where you can select the folder to copy:

5. By default, the tool will name the new folder to be created "Copy of" followed by the original folder name. It works well for me to delete those words, and add "- COPY" (or maybe some kind of context indication) at the end of the name. That way, it will appear below the original folder in your Google Drive:

The other process (B) is similar.
1. Authorize the app:

2. Indicate the source folder:

3. Name the target folder, click the "Copy files" checkbox. and click the "Preview" button:

4. Click the "Go" button:

5. Your folder will be copied and placed right where you can get to it:
If either or both of these techniques change substantially, or stop working altogether, please let me know right away, so I can update this post. Like a lot of our blog posts, lots of people bookmark them to refer to when they need a refresher. And as always, your comments below are welcome!
I have found two ways to do this, and I really don't have a strong preference for either. I would flip a coin and share only one here, but, given that neither of these processes is technically a Google tool, there is the possibility one or both may stop working in the future - sort of like "Labs" in Gmail: not officially supported, but use and enjoy it while you can.
So, up-front, here are two links for you to bookmark in your browser:
A. labnol.org/xcopy
B. http://tools.gappstips.com/drive/copy-folder/#
Here are the basic processes for both:
A:
1. Click the "A" link above. It will take you to a page that asks you to give the tool access to your Google Drive:


The other process (B) is similar.
1. Authorize the app:

2. Indicate the source folder:

3. Name the target folder, click the "Copy files" checkbox. and click the "Preview" button:


5. Your folder will be copied and placed right where you can get to it:
How To Copy A Google Doc
Have you ever wanted/needed to have a copy of a Google Doc? There are actually a few different ways:
If you are viewing a Google Doc, you can make a copy via the "File" menu:

You don't even need to be viewing a Google Doc - you can right-click a Google Doc in Google Drive and click on "Make a copy:"

If you are viewing a Google Doc, you can make a copy via the "File" menu:


Both of the above techniques will work for Google Docs you own, as well as those shared with you (with editing, commenting, or viewing privilege), creating a new copy that you will own.
Pretty simple, huh?
Thursday, August 11, 2016
How to Create a Formative Assessment in Google Drawings
It's surprisingly easy to create effective formative assessments in Google Drawings. Check it out here.
Friday, May 27, 2016
How to Find a Time Among Multiple People in Google Calendar
Have you ever spent more time scheduling a meeting among multiple people than the meeting itself? It's surprisingly simple and easy to avoid that, and schedule a meeting during an available time slot among all of your guests.
Friday, October 16, 2015
How To Make a Copy of a Google Doc
When someone shares a Google doc with you with viewing privilege, the menu options along the top of the document are very limited. However, you can make a copy of it and save it to your Google Drive. This will allow you to edit the new document without making any changes to the original. This is a handy setting for you and your students to know when sharing Google docs in your Moodle course.
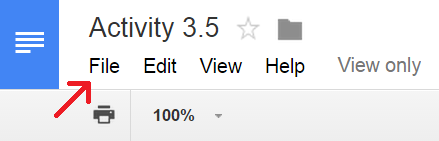
Step 1: Locate the “Make a copy...” option in the File menu
At the top left corner of the document locate and click the File menu to access the pull-down list.
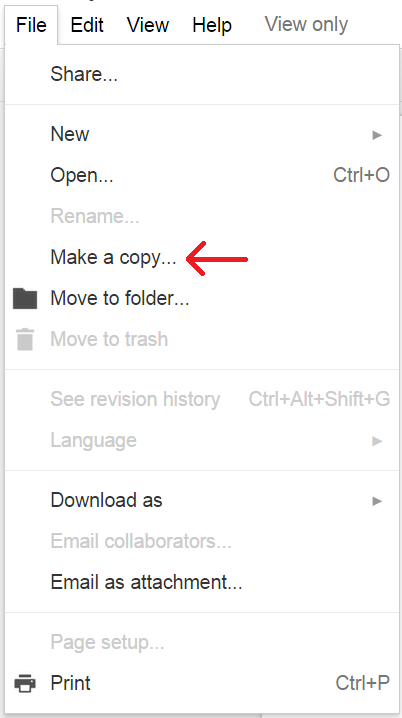
In the pull-down menu, select “Make a copy...”
Step 2: Rename and/or Save to Your Drive
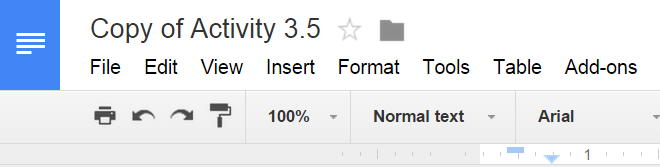
In the pop-up window that appears, you can change the name of the document, if you choose, and then click “OK”. This will open the document in a new browser tab, and all editing and menu options will now appear to you.
Step 3: Move copied Google Doc to your desired location within your Google Drive
The default location of the copied document is in your Drive home. Notice you are now listed as the owner of the file:

Step 1: Locate the “Make a copy...” option in the File menu
At the top left corner of the document locate and click the File menu to access the pull-down list.
In the pull-down menu, select “Make a copy...”
Step 2: Rename and/or Save to Your Drive
In the pop-up window that appears, you can change the name of the document, if you choose, and then click “OK”. This will open the document in a new browser tab, and all editing and menu options will now appear to you.
Step 3: Move copied Google Doc to your desired location within your Google Drive
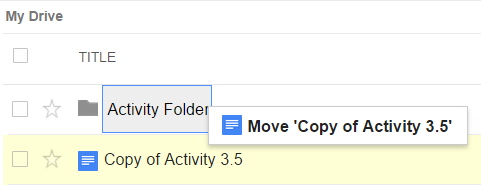
The default location of the copied document is in your Drive home. Notice you are now listed as the owner of the file:
To move this file to another location or folder in your Drive, click and hold the document name and drop it into your desired location.
CREDIT: Miranda Dudzik
Monday, September 28, 2015
Appointment Slots in Google Calendar
Wouldn't it be great if you could send out, or publish a link that people could click, and be taken to a view of your calendar, where they could see available appointment slots, and all they had to do to make an appointment with you is click an available slot, and then the event appears on both your and their calendar? Welcome to Appointment Slots!
1. Important: Make sure you are in Week or Day view. Click into any date/time area on your Google Calendar, and a popup will appear. Click "Appointment slots" at the top of the popup, and then "Edit details" at the bottom:

2. This is where you will do all (and it's not much) of the heavy lifting:

3. Make sure you put something into the "Title" field that will make sense to both you and your end user. For example, if you are setting up advising appointments with students, rather than "Appointment," consider "Advising Appointment."
4. You are likely using Appointment Slots in a repeating fashion. If so, click the "Does not repeat…" checkbox (I usually need to choose "Custom…":


Also be sure to indicate a meeting duration time, and a meeting location in the "Add location" field.
5. Consider something like this in the "Description" field:
Bring your education plan, degree audit documents from DegreeRunner (if you have access) and/or any documents pertaining to your college course of study.
6. Right-click and copy the long, blue URL:

That's what you can send to your students and/or place in your Moodle course and/or email message, etc.
7. Click the blue "SAVE" button in the upper left:

Here is what it looks like when I access someone else's Appointment slots link:

Check out all of those appointment slots - I can seem them in context with my other appointments!
When someone clicks to reserve a time slot with you, here is what they will see:

Note that they can customize the details of the event after they save it.
Pretty nifty, huh? I think you've got enough to go on, so go ahead and tinker with your own Appointment Slots. And share your impressions and experience in the comments section below!
1. Important: Make sure you are in Week or Day view. Click into any date/time area on your Google Calendar, and a popup will appear. Click "Appointment slots" at the top of the popup, and then "Edit details" at the bottom:

2. This is where you will do all (and it's not much) of the heavy lifting:
3. Make sure you put something into the "Title" field that will make sense to both you and your end user. For example, if you are setting up advising appointments with students, rather than "Appointment," consider "Advising Appointment."
4. You are likely using Appointment Slots in a repeating fashion. If so, click the "Does not repeat…" checkbox (I usually need to choose "Custom…":
I set this series of Appointment Slots to repeat weekly on Mondays and Wednesdays until the end of the term:
5. Consider something like this in the "Description" field:
Bring your education plan, degree audit documents from DegreeRunner (if you have access) and/or any documents pertaining to your college course of study.
6. Right-click and copy the long, blue URL:
That's what you can send to your students and/or place in your Moodle course and/or email message, etc.
NOTE: The Appointment Slot URL is the URL for ALL appointment slots for the Google Calendar in which you are creating the appointment slot. If you need/want a unique URL, make a different calendar for that.
7. Click the blue "SAVE" button in the upper left:
Here is what it looks like when I access someone else's Appointment slots link:

Check out all of those appointment slots - I can seem them in context with my other appointments!
When someone clicks to reserve a time slot with you, here is what they will see:

Note that they can customize the details of the event after they save it.
Pretty nifty, huh? I think you've got enough to go on, so go ahead and tinker with your own Appointment Slots. And share your impressions and experience in the comments section below!
For more info, see Google's Help Center page on Appointment Slots.
Monday, February 23, 2015
How To Force a Copy of a Google Doc
You probably know you can share a Google Doc with varying levels of privilege. The default setting is “Can Edit,” but there are two other settings, as well:

Those are great, but what if you need to share a Doc (or Sheet, or Slide) in a way that will let the other person(s) view only, but also optionally make a copy for themselves? You can tell them to click File > Make a Copy…

… but you know someone will eventually not understand that, and have issues with that step.
What if there was a way to force them to copy the Doc before they could even see it… maybe with a special link that will take them to a page that looks something like this:
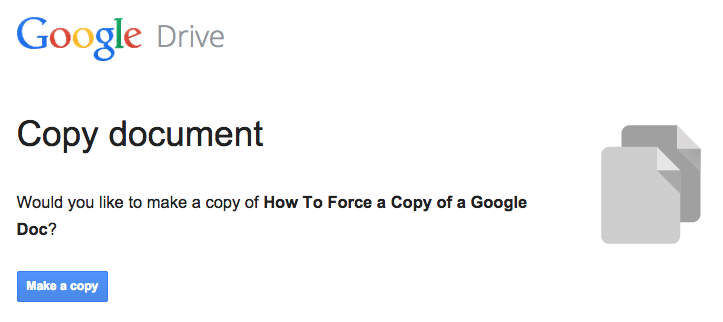
Funny thing is, this little trick so so easy, you will wish you had thought of it first. All you need to do is:
- Share the Doc (via the
button, in any context: editing, commenting, or just viewing) with the person on the other end, and then copy the link in your browser address bar.
- Look for the word “edit” at the end of the URL:
https://docs.google.com/document/d/11V9qEndTXVmnVEvtZMRk0cQefcdF5TxwqFQSvVlIcjE/edit
- Replace it with “copy,” and send that to them:
https://docs.google.com/document/d/11V9qEndTXVmnVEvtZMRk0cQefcdF5TxwqFQSvVlIcjE/copy
BOOM - it really is that easy!
NOTE: Have you ever seen a long URL link the ones above in an email message, and it didn't work when you clicked on it? That's usually because part of the URL was wrapped down to the line below it, breaking the valid link. A great way to avoid that is to shorten the URL via a tool like bitly.com.
NOTE: Have you ever seen a long URL link the ones above in an email message, and it didn't work when you clicked on it? That's usually because part of the URL was wrapped down to the line below it, breaking the valid link. A great way to avoid that is to shorten the URL via a tool like bitly.com.
Friday, January 23, 2015
How to Schedule Gmail Messages
I am hesitant to use 3rd-party apps in my Gmail until & unless someone I know has recommended it. Luckily, I keep this page bookmarked for just such an occasion. Let me know what you think of it!
Monday, December 15, 2014
The Future of Gmail?
PSST: Want sneak peek of Gmail's future?
Ok, it's not confirmed that Gmail will inherit Inbox's interface, but it is interesting to imagine, huh?
Ok, it's not confirmed that Gmail will inherit Inbox's interface, but it is interesting to imagine, huh?
Wednesday, August 27, 2014
Publishing a Slideshow Presentation in Moodle
So you want to publish your awesome PowerPoint or Keynote presentation in your Moodle course? Guess what concept gave birth to Google Apps for Education here at Linn-Benton Community College? This one!
We handle publishing of Google Docs and Google Presentations in Moodle courses differently. We publish Docs by linking to them (see how here), and Presentations by embedding them in a Moodle page within your course shell. Here's the step-by-step:
1. Open your Moodle course in one browser tab, and Google Drive in another tab.
2. If you already have the presentation you wish to publish in your Google Drive, skip to step #4; otherwise, click the red "Upload" button, and browse for the file you need:

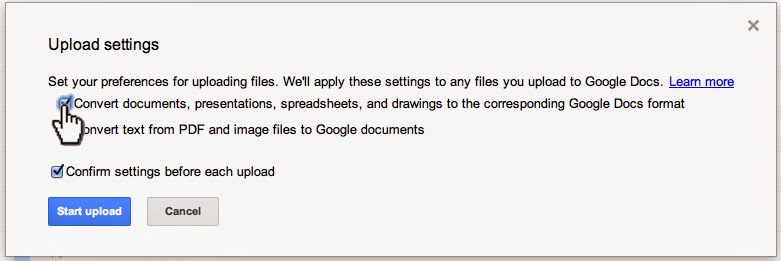
3. Make sure conversion is turned on (note: see how to set your Google Drive conversion settings here):




We handle publishing of Google Docs and Google Presentations in Moodle courses differently. We publish Docs by linking to them (see how here), and Presentations by embedding them in a Moodle page within your course shell. Here's the step-by-step:
1. Open your Moodle course in one browser tab, and Google Drive in another tab.
2. If you already have the presentation you wish to publish in your Google Drive, skip to step #4; otherwise, click the red "Upload" button, and browse for the file you need:
3. Make sure conversion is turned on (note: see how to set your Google Drive conversion settings here):
4. When you are in the editing interface for your Google Presentation, click File > Publish to the Web…
5. You will have a couple of confirmations to click through. Start publishing:
Are you sure (yes, of course I'm sure!):
6. You will get a dialog box that lets you configure the size of the presentation you are about to embed in your Moodle course. Choose "Small" presentation size, so that users on small monitors (think netbooks, etc.) won't have to scroll left and right to view your presentation. They can always choose to view it full screen:
7. Click in the "Embed code" field and copy it to the clipboard:
8. Now go to your Moodle course (that other browser tab), and make sure editing is turned on:
9. Click the "Add an Activity or resource" link in the content block where you want the link to appear (of course, you can always move it later):
10. Select "Page" near the bottom of the left pane:
11. Input in the "Name" and "Description" fields:
12. You may need to click the Toolbar Toggle…
… to get the "Edit HTML source" button visible to click:
13. This makes the HTML source editor dialog box appear. Paste the HTML from the Google Presentation (from step #7 above) into the input box, and click the "Update" button:
14. Click either the "Save and Return to Course" or "Save and Display" button at the bottom.
That's all there is to it. You don't need to redo the above steps if and when you want to edit your presentation; just access it in Google Drive and you're done - it's published and embedded in Moodle (and elsewhere, if you choose), so it's a live document to which your students will have one-click access, without needing anything more than a modern web browser. Cool, huh?
Comment below, and MOODLE ON.
Thursday, April 3, 2014
Sharing a Google Doc With Specified & Unspecified People
When it comes to getting eyeballs onto a Google Doc (including Presentations and Spreadsheets), there are two main paths to follow: Publishing, and Sharing. See our tutorial on publishing a Google Doc here.


When you think of sharing a Google Doc, there are a lot more options and features, compared to the old email attachment method. I am writing this tutorial in the context of a student sharing a doc with their instructor and other classmates, but the concept can be easily applied to a number of office procedure scenarios where an online document needs to be efficiently shared among people. Also, this is just an overview, so be sure to explore the features and benefits of the options we don't cover here; there are some great tools there! Here goes:
1. When you are viewing the Google Doc in question, click the blue "Share" button in the upper right:
2. This brings up the "Share with others"dialog box. Click "Get shareable link"

3. Click the "Anyone at Linn-Benton Communit…" area, then click "More…" at the bottom of the dropdown menu:

4. "Anyone with the link" is a good way to share most docs in an LMS course. That won't require students to be logged in to their Google Apps for Ed account to view it.

Note that "Can view" is the default Access setting, but you can also choose to give people editing or commenting privilege. NOTE: "Can comment" is non-editing.
5. Click the "Save" button at the bottom, and the link will be ready to copy to the clipboard:

6. Paste that link into your Moodle course, email message, etc., and people will be able to access the live document!
Ok, now we will branch off a little to show how to share with a specified person(s). Take a look at the screenshot in step 2, the "Sharing settings" dialog. Here it is again, after clicking in the "Invite people" field:
When you start typing names in the field, note how people's names start to appear. Be sure to select the correct email address, as many employees have both a staff- and student-formatted account:

Decide among the various sending options, and click the blue "Send" button.
And that's how you share a Google Doc with specific people!
We would love to know how you share Google Docs, so feel free to share via a comment below!
Subscribe to:
Posts (Atom)