Ok, it's not confirmed that Gmail will inherit Inbox's interface, but it is interesting to imagine, huh?
Showing posts with label Oregon Google Apps for Education. Show all posts
Showing posts with label Oregon Google Apps for Education. Show all posts
Monday, December 15, 2014
The Future of Gmail?
PSST: Want sneak peek of Gmail's future?
Ok, it's not confirmed that Gmail will inherit Inbox's interface, but it is interesting to imagine, huh?
Ok, it's not confirmed that Gmail will inherit Inbox's interface, but it is interesting to imagine, huh?
Wednesday, October 1, 2014
Announcing Google Drive for Education
In a little over two years, Drive has become the cloud storage and sharing solution for more than 190 million people worldwide who use it regularly at home, work and school. For many of the 30 million students and educators using Google Apps for Education, Drive has even replaced their bookbags. Why lug around piles of paper or overstuffed binders when every type of document or file can be retrieved from the nearest Chromebook, tablet, smartphone or browser?
Read more here.
Read more here.
Tuesday, September 30, 2014
Create & Submit A Writing Assignment for Moodle Via Google Docs, Spreadsheets & Presentations
PSST: Guess what? Unless you are taking a class on a Microsoft Office product (Word, Excel, PowerPoint), you probably don't need Microsoft Office (that goes for real life, too). Do you have a writing assignment to turn in? Here's how to do it in Google Docs, without printing a single page (with one exception):
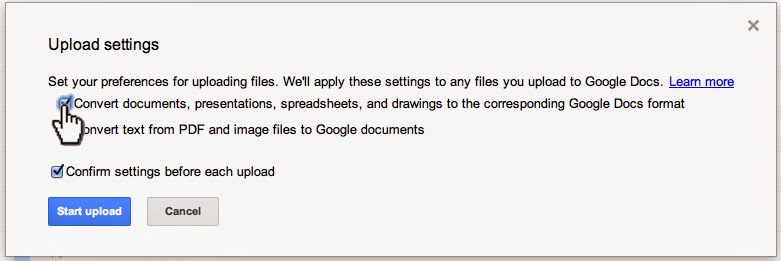
First, if you are just starting to use Google Drive, Check your Google Drive Upload Settings. You will be creating a doc, not uploading a file in this tutorial, but this will be handy for when you start uploading files into your Google Drive.
Step #1: When you are logged in to your LBCC Email, click the nine tiny squares in the upper right, and then click on the "Drive" icon:

Step #2: Click the red "New" button in the upper left, then click "Google Docs"

A new browser tab will open with your new doc ready to go.
Step #3: Click where you see "Untitled document" in the upper left:


PAPER SUBMISSION: If your instructor has set up your assignment to require a hard copy, you can print it out and hand it in. You've done this before. You know what to do:

First, if you are just starting to use Google Drive, Check your Google Drive Upload Settings. You will be creating a doc, not uploading a file in this tutorial, but this will be handy for when you start uploading files into your Google Drive.
Step #1: When you are logged in to your LBCC Email, click the nine tiny squares in the upper right, and then click on the "Drive" icon:
Step #2: Click the red "New" button in the upper left, then click "Google Docs"
Step #3: Click where you see "Untitled document" in the upper left:
Give your doc a name that makes sense:
Step #4: Your instructor may choose among a variety of assignment submission procedures:
TEXT INPUT: If your instructor has set up your assignment to require text input, you can select and copy all of the text from your Google Doc, and paste it into the Moodle assignment text input box.
FILE SUBMISSION: If your instructor has set up your assignment to require a file upload, you can download your Google Doc into the required file type, and upload it into the Moodle assignment:
GOOGLE DOC SHARE: If your instructor has set up your assignment to require you share your submission with them via Google Drive, you can do so via the blue "Share" button in the upper right:
Click in the "Invite people" field and start typing your instructor's name. Be sure to indicate their staff account (@linnbenton.edu), and not their student account (@mail.linnbenton.edu):
Indicate their sharing privilege setting (most likely "Can comment"), and then click the blue "Send" button:
Step #5: Be sure to follow any additional instructions in the Moodle assignment to finalize your assignment submission.
Wednesday, August 27, 2014
Publishing a Slideshow Presentation in Moodle
So you want to publish your awesome PowerPoint or Keynote presentation in your Moodle course? Guess what concept gave birth to Google Apps for Education here at Linn-Benton Community College? This one!
We handle publishing of Google Docs and Google Presentations in Moodle courses differently. We publish Docs by linking to them (see how here), and Presentations by embedding them in a Moodle page within your course shell. Here's the step-by-step:
1. Open your Moodle course in one browser tab, and Google Drive in another tab.
2. If you already have the presentation you wish to publish in your Google Drive, skip to step #4; otherwise, click the red "Upload" button, and browse for the file you need:

3. Make sure conversion is turned on (note: see how to set your Google Drive conversion settings here):


We handle publishing of Google Docs and Google Presentations in Moodle courses differently. We publish Docs by linking to them (see how here), and Presentations by embedding them in a Moodle page within your course shell. Here's the step-by-step:
1. Open your Moodle course in one browser tab, and Google Drive in another tab.
2. If you already have the presentation you wish to publish in your Google Drive, skip to step #4; otherwise, click the red "Upload" button, and browse for the file you need:
3. Make sure conversion is turned on (note: see how to set your Google Drive conversion settings here):
4. When you are in the editing interface for your Google Presentation, click File > Publish to the Web…
5. You will have a couple of confirmations to click through. Start publishing:
Are you sure (yes, of course I'm sure!):
6. You will get a dialog box that lets you configure the size of the presentation you are about to embed in your Moodle course. Choose "Small" presentation size, so that users on small monitors (think netbooks, etc.) won't have to scroll left and right to view your presentation. They can always choose to view it full screen:
7. Click in the "Embed code" field and copy it to the clipboard:
8. Now go to your Moodle course (that other browser tab), and make sure editing is turned on:
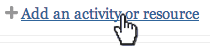
9. Click the "Add an Activity or resource" link in the content block where you want the link to appear (of course, you can always move it later):
10. Select "Page" near the bottom of the left pane:
11. Input in the "Name" and "Description" fields:
12. You may need to click the Toolbar Toggle…
… to get the "Edit HTML source" button visible to click:
13. This makes the HTML source editor dialog box appear. Paste the HTML from the Google Presentation (from step #7 above) into the input box, and click the "Update" button:
14. Click either the "Save and Return to Course" or "Save and Display" button at the bottom.
That's all there is to it. You don't need to redo the above steps if and when you want to edit your presentation; just access it in Google Drive and you're done - it's published and embedded in Moodle (and elsewhere, if you choose), so it's a live document to which your students will have one-click access, without needing anything more than a modern web browser. Cool, huh?
Comment below, and MOODLE ON.
Tuesday, March 4, 2014
How to Publish a Google Doc in a Moodle Course
One of the best ways to publish eLearning content is via Google Docs, rather than as a page within your LMS (Learning Management System). This will allow you to keep all of your course content in one place (Google Drive), from which you can edit with no need to republish.
Step 1: From within a Google Doc you wish to publish in your Moodle course, click File > Publish to the web… (NOTE: not the “File” menu for the browser itself):

Step 2: In the “Publish to the web” dialog that appears, note the available checkboxes. We recommend leaving them both as-is. Click “Start publishing.”
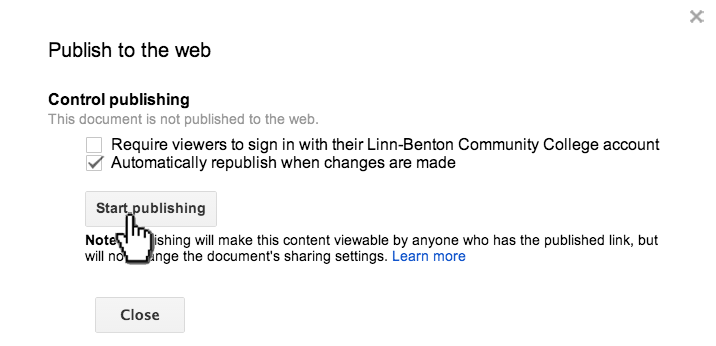
Step 3: Click “OK.”

Step 4: In the “Publish to the web” dialog, click in the “Document link” field and copy the link to the clipboard.

Step 5: In your Moodle course, turn editing on:
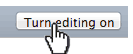
and click in the content block where you wish the link to appear.

Step 6: In the “Add an activity or resource” dialog box, select “URL,” then click the “Add” button:

Step 7: This is the “Adding a new URL” page. Note that the field with asterisks are required. Also, we recommend indicating the link to appear in a new browser window. Make your inputs and selections, and click the “Save and return to course” button at the bottom.

Step 8: Locate your new link, and move it, if necessary (with the “” icon), then test it out by clicking the link. It should open in a new browser window or tab.

OPTIONAL: You can shorten the URL via bit.ly. The link for the published version of this Google Doc is: http://bit.ly/1hDp20U
Sunday, December 15, 2013
Update to the Missing Google Menu Bar Issue
Here is an update to our previous "What!? Google Changed the Interface Again!!!?" post!
Apparently, not every "interface improvement" is a true improvement for everyone. To prove the point, a tech-savvy Google user has come up with a browser extension to restore the useful Google menu bar to its rightful location (and helping us return to one-click navigation!). Behold the Proper Menubar!
Thanks to Perry Carmichael for passing this along.
Monday, November 4, 2013
What!? Google Changed the Interface Again!!!?
Are you missing the links along the top of your browser window when you're in Gmail to get to your Google Calendar, Drive, etc.? Well, Google went and made things… better for us again. Here is where you can find those links now (in the upper right):

PS: If you thought you might have been going crazy before reading this post, please note that just because you discovered that this issue was related to Google changing the interface does not mean you aren't crazy.

PS: If you thought you might have been going crazy before reading this post, please note that just because you discovered that this issue was related to Google changing the interface does not mean you aren't crazy.
Thursday, April 29, 2010
Oregon Offers Google Programs to Schools
3 Stories:
Oregon became the first state in the nation to sign up for Google Apps for Education, which is free, in kindergarten though 12th grade classrooms across its 197 school districts. Read more here.
Oregon will be the first state to offer Google's free Internet communication and collaboration service to its public schools. Read more here.
Oregon educators hope a free Web-based software application will help students become digitally literate while saving money for struggling school districts. The Oregon Department of Education began offering Google Apps for Education to public school districts on Wednesday. Read more here.
Subscribe to:
Posts (Atom)