Showing posts with label Google Docs. Show all posts

Thursday, April 10, 2025

Tabs in Google Docs

 A pleasant surprise landed in my lap today: a feature I have been dreaming about (yes, I suffer from weird dreams about tech stuff - don't tell me you don't!) has finally surfaced - tabs in Google Docs! My imagined solution looked similar to the sheet tabs along the bottom of a Google Sheet:


The new Tabs feature in Google Docs are accessible in the left margin:


My first hope after getting my head around Google Docs tabs involved sharing the contents of a specific tab, but there currently isn't a way to employ tab permissions (yet?), but at least we have emojis! I'm just happy to have a way for work group members to be able to use separate tabs within the same team doc, to focus on their specific area without interfering with others’ work. There are additional benefits listed on this info page.

What other uses come to mind for you for Google Doc Tabs? Comment below!

Thursday, August 16, 2018

PDF Versions in Google Drive

A colleague came to us this morning with an issue regarding Google Drive. She had a PDF in her Google Drive that she had created from a hard copy scan, and when she uploaded another PDF with the same name, she noticed Google Drive had replace the original file with the new file. I had a bit of familiarity with how to update a PDF in Google Drive to a new version manually (more on that later), but hadn't seen or noticed it happening automatically.

When I tested it out for myself, I saw that Google Drive had noticed the second PDF had the same exact name as the original, and updated the original one for me. It also provided this handy popup to inform me of the kind deed:


Of course, a lot of people just click right through those and continue working, but I figured if it's happening to one person, it's happening to others, too, so here is the blog post to cover you.

The solution we landed on comes from right-clicking the PDF in Google Drive, and then clicking "Manage versions…"


That will show a popup from which you can see previous versions:


If you click the "More actions" (three vertical dots) to the right of one of the file versions, you will see… well, more actions you can take:


Now for the ADDED VALUE feature of this post: look at the "UPLOAD NEW VERSION" button in the "Manage versions" popup above. You can manually update a PDF to a new version! That may not seem so exciting until and unless you have a link to a PDF in Google Docs appearing on a website(s), and need to update it. No need to update the URL - just upload a new version!


Friday, January 19, 2018

How to Print a Google Doc with Comments

A friend asked me if there was a way to print a Google Doc with the comments included in the print job. They added if I had a solution for them, it would save their marriage. I didn't feel like getting into that aspect of the issue too deeply, but I am happy to help a friend's marriage.

Wednesday, November 15, 2017

How to Digitally Sign a Google Doc

Have you ever needed to sign a Google Doc to submit for some type of action requiring a signature? Here is a method I wish I had thought of!

Thursday, September 21, 2017

Google Docs Email Collaborators

You have probably attached a Google Doc to a Gmail message via the weird little "Drive" icon button at the bottom left of the email interface:


Did you know you can also easily email any or all of the people who have access to a Google Doc, from within the Doc itself? Check out "Email collaborators" in the "File" menu:


This is one of those "anything you can do to make it easy for people to work together" features.

Tuesday, November 22, 2016

How To Copy A Google Drive Folder

You may know how to copy an individual Google Doc, but have you ever thought it might be useful to be able to copy an entire folder of Google Docs (and even subfolders, too!) in one fell swoop, rather than one at a time?

I have found two ways to do this, and I really don't have a strong preference for either. I would flip a coin and share only one here, but, given that neither of these processes is technically a Google tool, there is the possibility one or both may stop working in the future - sort of like "Labs" in Gmail: not officially supported, but use and enjoy it while you can.

So, up-front, here are two links for you to bookmark in your browser:

A. labnol.org/xcopy

B. http://tools.gappstips.com/drive/copy-folder/#

Here are the basic processes for both:

A:

1. Click the "A" link above. It will take you to a page that asks you to give the tool access to your Google Drive:


2. This will produce a pop-up:


3. You will be taken to a page that looks like this:


4. It's probably going to be easier to browse for the folder in your Google Drive if you click the "Select Folder" button. This produces (yet another!) pop-up, where you can select the folder to copy:


5. By default, the tool will name the new folder to be created "Copy of" followed by the original folder name. It works well for me to delete those words, and add "- COPY" (or maybe some kind of context indication) at the end of the name. That way, it will appear below the original folder in your Google Drive:


The other process (B) is similar.

1. Authorize the app:


2. Indicate the source folder:


3. Name the target folder, click the "Copy files" checkbox. and click the "Preview" button:


4. Click the "Go" button:


5. Your folder will be copied and placed right where you can get to it:


If either or both of these techniques change substantially, or stop working altogether, please let me know right away, so I can update this post. Like a lot of our blog posts, lots of people bookmark them to refer to when they need a refresher. And as always, your comments below are welcome!


How To Copy A Google Doc

Have you ever wanted/needed to have a copy of a Google Doc? There are actually a few different ways:

If you are viewing a Google Doc, you can make a copy via the "File" menu:


You don't even need to be viewing a Google Doc - you can right-click a Google Doc in Google Drive and click on "Make a copy:"


Both of the above techniques will work for Google Docs you own, as well as those shared with you (with editing, commenting, or viewing privilege), creating a new copy that you will own.

Pretty simple, huh?

Monday, October 24, 2016

TECH Talk - Publishing & Sharing a Google Doc

There are two paths toward getting other eyeballs on your Google Docs: publishing and sharing.


Thursday, October 6, 2016

Setting a Default Font and Size in Google Docs

To set your preferred font and size default for all of your new Google Docs:

1. Open or create a Google Doc

2. Select some text - even just one word - in your choice of font and size of your preference
3. Click the "Format" menu > Paragraph styles > Normal text > Update 'Normal text' to match:


4. With the text still selected, click the "Format" menu again > Paragraph styles > Save as my default styles:


Once the default font has been set, all new documents or presentations that you create will use this font until you change the default option again.


Friday, October 16, 2015

How To Make a Copy of a Google Doc

When someone shares a Google doc with you with viewing privilege, the menu options along the top of the document are very limited. However, you can make a copy of it and save it to your Google Drive. This will allow you to edit the new document without making any changes to the original. This is a handy setting for you and your students to know when sharing Google docs in your Moodle course.

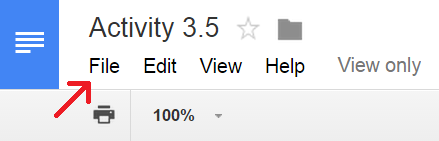
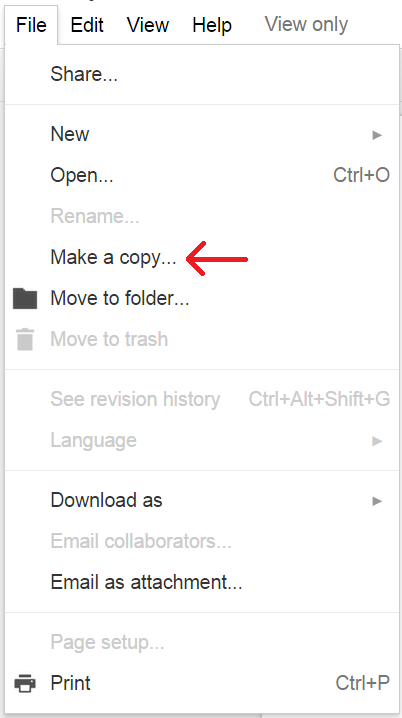
Step 1: Locate the “Make a copy...” option in the File menu

At the top left corner of the document locate and click the File menu to access the pull-down list.


In the pull-down menu, select “Make a copy...”


Step 2: Rename and/or Save to Your Drive

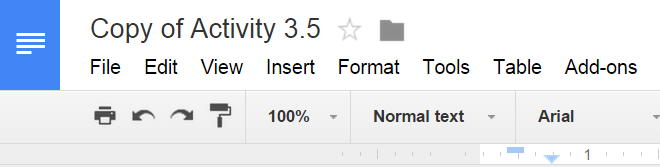
In the pop-up window that appears, you can change the name of the document, if you choose, and then click “OK”. This will open the document in a new browser tab, and all editing and menu options will now appear to you.


Step 3: Move copied Google Doc to your desired location within your Google Drive

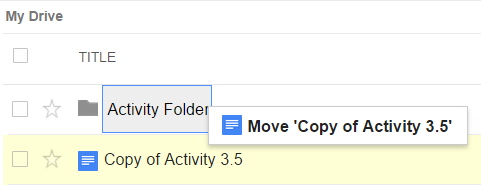
The default location of the copied document is in your Drive home. Notice you are now listed as the owner of the file:


To move this file to another location or folder in your Drive, click and hold the document name and drop it into your desired location.


CREDIT: Miranda Dudzik

Friday, September 18, 2015

Google Docs and Track Changes…

So you say you don't use Google Docs because you must have the "Track Changes" feature of Microsoft Word. Or maybe it's Mail Merge you can't live without. In typical Google fashion, they have taken those concepts to a whole new level (not to mention Revision History, Notifications, Bookmarks, etc.):


Think of the educational and administrative implications of these advancements - it's mind-boggling!

Wednesday, April 29, 2015

Google Docs Sharing Basics

This blog post covers the basics of sharing of Google Docs, Sheets, and Slides.

You can share a Google Doc (to include Docs, Sheets, and Slides) by right-clicking on the doc in your Google Drive and selecting "Share… Share…"

If you are viewing a doc, you can also click the blue "Share" button in the upper right:

Either method above makes the "Share with others" dialog box:
The simplest and most straightforward way to share the doc is to start typing the name of the person with which you want to share the doc. By default, the doc will be shared with an editing privilege, unless you want a different setting:
Commenting is a handy way to hold a discussion on a document, and viewing is for letting people see, but not edit or comment. Keep in mind that all three sharing privilege settings will allow the recipient to make a copy of the doc that they will own and have full editing rights.

Note the "Notify people via email" checkbox on the lower right is checked by default. That will general an email message to your recipient(s) with a link to the Google Doc you are sharing. If you uncheck that box, they will have to look in their "Shared with Me" section of their Google Drive.

Want to explore more options for sharing? Click the "Get shareable link" feature in the upper right of the "Share with others" and then the little disclosure triangle to the left of "Copy link:"

Click "More…" at the bottom for even more options. Explore what all of those options enable you to do in sharing Google Docs, and you will begin to wonder how you ever got by without these tools and techniques!

If you discover a useful feature or process, be sure to share it in the comments below.

Wednesday, April 22, 2015

Uploading a Word Document into Google Docs

If you haven't used Google Drive at all, or very much, do yourself a favor and get set up to use all of the doc sharing and editing features by configuring your Google Drive Upload Settings first.

When I mention the editing features of Google Docs, I realize that's one of those things that's easier to understand from practice, rather than reading. Let it suffice to say that, unless you are using more advanced features of Microsoft Office (Word, Excel, and PowerPoint), there is a strong chance you can do without those tools once and for all. I have had almost zero use in my personal and professional work for many years now.

So you want to learn how to upload a Word Doc (or, for that matter, an Excel or PowerPoint file) in your Google Drive? It's really easy. First, log into your Google Apps for Education account (that's your LBCC Gmail account). Next, look for the nine little squares (I call it the "Rubic's Cube) in the upper right, and then the "Drive" icon:


A new browser tab opens showing your Google Drive. If you see a prompt across the top of the page offering to "install" Google Drive onto your computer, you can close that out. You most likely won't need or want that, especially if you are working on a desktop machine that's always connected to the Internet.

Ready to upload your first Word Doc? Not so fast: it's probably a good idea to set up some basic folders first. Click the red "New" button in the upper left:


Go ahead and create a few folders, so you can start off being organized… or just jump right in like I did, and organize later.


Ready to upload your first Word Doc? Ok, click the red "New" button again, and then click "File Upload."


If you adjusted your Upload Settings (see the top of this post), your Word Doc will be uploaded, and converted to an editable Google Doc format on-the-fly. Double-click on the Doc to edit it, share it, publish it, etc. Welcome to a higher level of functionality in your document workflow!

Wednesday, November 19, 2014

Downloading a Google Doc

I just received a question:

"Is it possible to convert a Google doc to a Word document?"

Why yes, it is possible:


Tuesday, September 30, 2014

Create & Submit A Writing Assignment for Moodle Via Google Docs, Spreadsheets & Presentations

PSST: Guess what? Unless you are taking a class on a Microsoft Office product (Word, Excel, PowerPoint), you probably don't need Microsoft Office (that goes for real life, too). Do you have a writing assignment to turn in? Here's how to do it in Google Docs, without printing a single page (with one exception):

First, if you are just starting to use Google Drive, Check your Google Drive Upload Settings. You  will be creating a doc, not uploading a file in this tutorial, but this will be handy for when you start uploading files into your Google Drive.


Step #1: When you are logged in to your LBCC Email, click the nine tiny squares in the upper right, and then click on the "Drive" icon:


Step #2: Click the red "New" button in the upper left, then click "Google Docs"


A new browser tab will open with your new doc ready to go. 

Step #3: Click where you see "Untitled document" in the upper left:


Give your doc a name that makes sense:


Step #4: Your instructor may choose among a variety of assignment submission procedures:

TEXT INPUT: If your instructor has set up your assignment to require text input, you can select and copy all of the text from your Google Doc, and paste it into the Moodle assignment text input box.

FILE SUBMISSION: If your instructor has set up your assignment to require a file upload, you can download your Google Doc into the required file type, and upload it into the Moodle assignment:


GOOGLE DOC SHARE: If your instructor has set up your assignment to require you share your submission with them via Google Drive, you can do so via the blue "Share" button in the upper right:


Click in the "Invite people" field and start typing your instructor's name. Be sure to indicate their staff account (@linnbenton.edu), and not their student account (@mail.linnbenton.edu):


Indicate their sharing privilege setting (most likely "Can comment"), and then click the blue "Send" button:


PAPER SUBMISSION: If your instructor has set up your assignment to require a hard copy, you can print it out and hand it in. You've done this before. You know what to do:


Step #5: Be sure to follow any additional instructions in the Moodle assignment to finalize your assignment submission.

Friday, September 19, 2014

How to Embed a Google Doc in Moodle


By Miranda Dudzik:


When you publish a Google doc, you can either link it to your Moodle course, or embed it directly in a page.  


Step 1: Navigate to your Moodle course.


  • If you have not done so already, navigate to your published Google doc and copy the embed code that appears in the “Publish to the web...” window


Get Embed Code to the Published Doc.png


  • Navigate to your course and turn editing on:


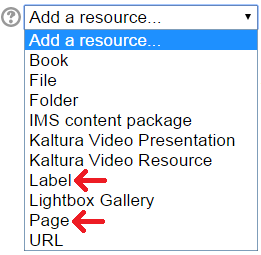
  • You can either embed the document in a content section on the main course page as a new label, or in a new page. Navigate to the content section where you want the document or new page to appear, and click “Add a resource...” to access the pull-down menu. Select the option you want.


Add a Label or Page.png


Step 2: Name the new resource.


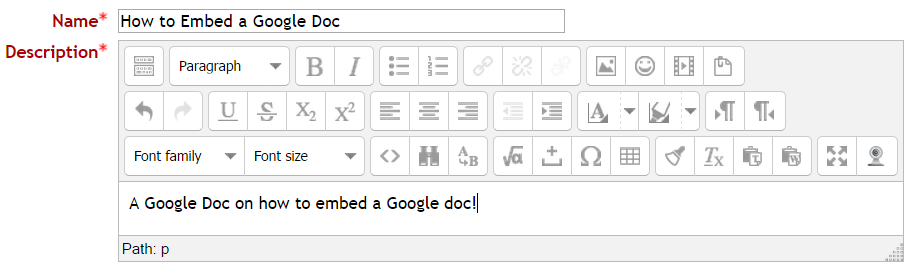
  • In the “Adding a new resource” page that opens, name your resource. If you are creating a new page, you will also need to add a description.


Adding a New Page.png


Step 3: Open the HTML source editor.


  • If adding a label, there is only one text editor that appears. If adding a new page, scroll to the text editor in the Content section.


Page Content Section.png


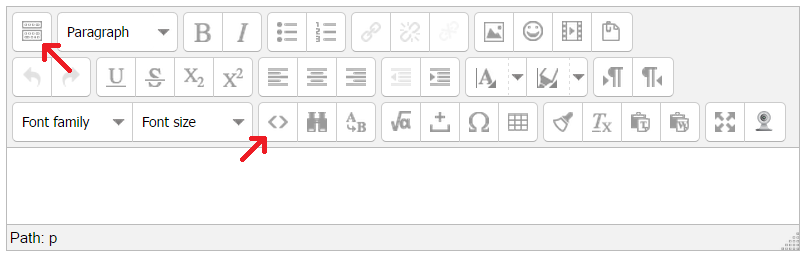
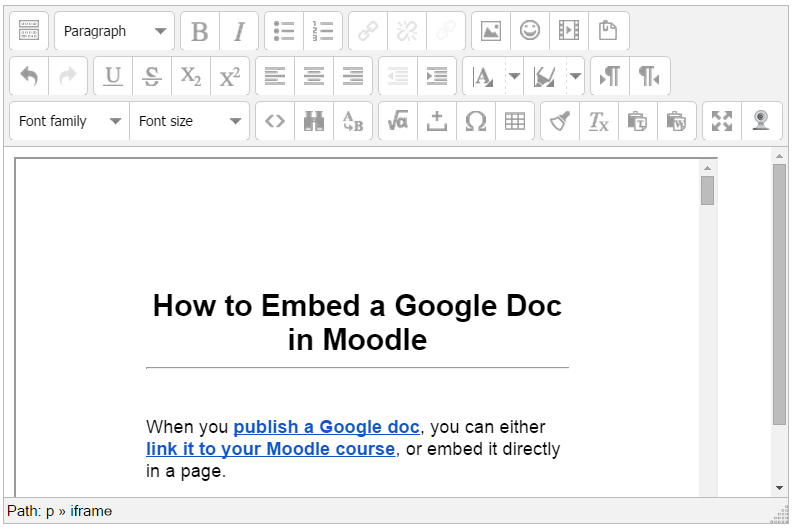
  • Expand the editing toolbar (if it is not expanded already),  by clicking on the Toolbar toggle icon in the top left corner of the text editor. The expanded editing toolbar is shown in the image below.


Text Editor.png


  • To open the HTML source editor, click the HTML source icon. HTML Source Icon.png (see image above).


Step 4: Paste embed code into HTML source editor.
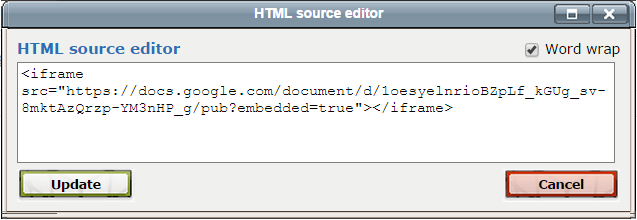
HTML Source Editor.png


  • The image above is what your HTML embed code should look like, the only difference being the actual URL for your Google doc.


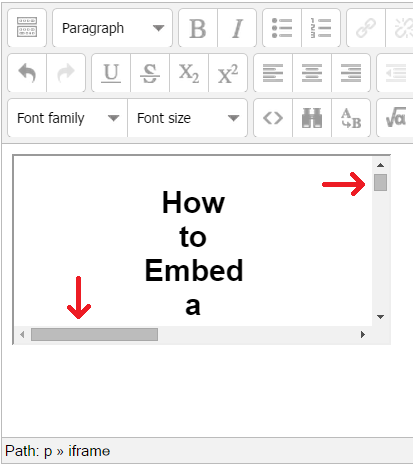
  • Click “Update” to close the HTML source editor. You should notice that the Google doc is now displayed in the text editor, however, it is relatively small, and depending on the size of your document, there are scroll bars to the side and bottom of the frame window.


Embedded Google Doc.png


Step 5: Customize the size of the display frame.


  • In order to enlarge the display frame and expand the view of the document, you need to add a snippet of code into the embed code that you just pasted in that will define the width and height of the display frame. That snippet is:


width="560" height="315"


The numbers in this snippet of code define the dimensions of the display frame. You can change these numbers to fit your desired size, as long as you do not change anything else in the piece of code.


This snippet must be added in directly after “<iframe” in your original source code, and right before “src=...”.


  • For example, if your embed source code is :


<iframe src="https://docs.google.com/document/d/1oesyelnrioBZpLf_kGUg_sv-8mktAzQrzp-YM3nHP_g/pub?embedded=true"></iframe>


The snippet gets added like this (red font is only for demonstration purposes):


<iframe width="560" height="315" src="https://docs.google.com/document/d/1oesyelnrioBZpLf_kGUg_sv-8mktAzQrzp-YM3nHP_g/pub?embedded=true"></iframe>


  • Reopen the HTML source editor and add the snippet of code as demonstrated above.


HTML Source Editor.png
  • Click “Update”. Your new display frame should look similar to this:


Enlarged Display Frame.png


The scroll bars are still there, but the frame is much larger. You can adjust the numbers in the code snippet to make it bigger or smaller to fit your needs.  The larger the numbers, the larger the display frame.


NOTE: You can use these instructions to embed Google docs in other places than just labels and pages. This technique also works in pages that you add to Lesson and Book activities as well.


Use caution when determining the size of your frame, if you make it too large it might display poorly in the page you put it in. Also keep in mind that large embedded files can be problematic for Moodlers who have small computer screens or who use mobile devices.