Thursday, March 19, 2015

Importing Grades Into Moodle

Here is the basic process of importing grades from Google Sheets into a Moodle course shell.  Similar processes can be used if MS-Excel is the spreadsheet of choice.  Obtain the CSV file from MS-Excel by performing a “Save as” and selecting “CSV (MS-DOS) (*.csv) in the “Save as type:” drop-down.


The best way to import a spreadsheet of your students' grades into Moodle is to first download your Moodle gradebook as an Excel spreadsheet. This will give you something to build on in Excel that will map back to the Moodle gradebook.

Begin with your Moodle course enrolled with students and Moodle assignments in place.


  1. In your Moodle course Administration block, click on the Grades icon.  From the Grades screen, click on the Export tab.  Next, select the “Excel spreadsheet” link below Export.  
  2. In the Options box, select the “Include feedback in export” if you want the spreadsheet to include columns for grade comments.  Typically, one will want all assignments to be exported, so ensure that all items in the “Grade items to be included” box has those items you want.


    At the bottom of the page, click the “Submit” button.
  3. On the next screen, select the “Download” button to download the MS-Excel spreadsheet to your computer.

You now have a spreadsheet that is nicely matched to your Moodle gradebook.  This will make importing your grades much easier and save time by having Moodle create a template, pre-populated with your assignments and students.


Moodle will allow two types of files to be imported into the gradebook: 1) CSV which is the default, and 2) XML.  This procedure only deals with importing CSV files.


  1. As a logged in editor of a Google Sheets grade sheet, click on File → Download as → Comma-separated values.  The file will download to your internet browser default location (often the “Downloads” folder).

  2. As a logged in editing instructor in Moodle, navigate to your course that is awaiting grades.  In the Administration block, click on the Grades icon.  From the Grades screen, click on the Import tab.
  3. Upload the saved CSV file into the dash-lined rectangle area either by dragging and dropping the file from the computer file manager, or by browsing for the file by clicking on the “Choose a file...” button.  Wait until the green status bar disappears and only the full file name is shown (see image below).  Click on the “Upload grades” button to proceed.


  4. This next screen is a preview of the CSV file and allows one to correctly map the columns in the CSV to the Moodle gradebook.  Verify that the preview looks correct.
  5. LBCC students login to Moodle using their LBCC provided student eMail address.  This is Moodle’s “Username”.  In the “Identify user by” box, ensure that the data is as follows:
    Map from → “LBCC Email Address”
    Map to → “Username”
  6. In the “Grade item mappings” box, select which assignments you wish to upload.  The column to the left, and in bold text represents the grade column header found in the CSV file.  Match bold text header to the drop-down list of gradebook column headers found in the Moodle gradebook.  NOTE:  Depending on how the spreadsheet was created, these headers may not match as they do in the above image.  Be extremely careful that these columns match, or you may end up with grades imported into the wrong column.  
  7. When all grade item mappings have been selected, click the “Upload grades” button located at the bottom of the page.  Grades can be ignored if desired; not all items must be mapped.
  8. If there was a problem with the mappings, an error will usually occur right away and provide a small error message that you must troubleshoot.  If the process is taking some time, that usually means that the grades will import successfully.  Be patient and wait for the “Grades imported successfully” message to appear.


Monday, February 23, 2015

How To Force a Copy of a Google Doc

You probably know you can share a Google Doc with varying levels of privilege. The default setting is “Can Edit,” but there are two other settings, as well:


Those are great, but what if you need to share a Doc (or Sheet, or Slide) in a way that will let the other person(s) view only, but also optionally make a copy for themselves? You can tell them to click File > Make a Copy…


… but you know someone will eventually not understand that, and have issues with that step.


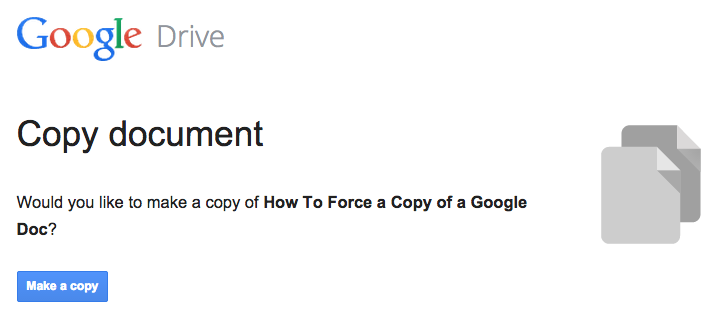
What if there was a way to force them to copy the Doc before they could even see it… maybe with a special link that will take them to a page that looks something like this:


Funny thing is, this little trick so so easy, you will wish you had thought of it first. All you need to do is:


  1. Share the Doc (via the button, in any context: editing, commenting, or just viewing) with the person on the other end, and then copy the link in your browser address bar.


  1. Look for the word “edit” at the end of the URL:


https://docs.google.com/document/d/11V9qEndTXVmnVEvtZMRk0cQefcdF5TxwqFQSvVlIcjE/edit


  1. Replace it with “copy,” and send that to them:


https://docs.google.com/document/d/11V9qEndTXVmnVEvtZMRk0cQefcdF5TxwqFQSvVlIcjE/copy


BOOM - it really is that easy!

NOTE: Have you ever seen a long URL link the ones above in an email message, and it didn't work when you clicked on it? That's usually because part of the URL was wrapped down to the line below it, breaking the valid link. A great way to avoid that is to shorten the URL via a tool like bitly.com.

Thursday, February 12, 2015

16 Signs of a Learning Culture

Read this interesting blog post, and then consider this:

How would you describe the learning culture here at LBCC? And by "learning culture," we are talking about not just our students, but also college employees. And by "college employees," we are talking about all college employees, because we are all contributors in the business… no, the MISSION of facilitating other people's learning so they have more abundant lives. What does it say to our students and our communities if community college employees are reluctant - even just passive about nurturing their own personal learning, growth, and development?


Friday, January 23, 2015

How to Schedule Gmail Messages

I am hesitant to use 3rd-party apps in my Gmail until & unless someone I know has recommended it. Luckily, I keep this page bookmarked for just such an occasion. Let me know what you think of it!

Wednesday, January 21, 2015

Typography Is Fun!

Typography is such a subjective (and fun!) realm. I have seen numerous studies over the years that claim serif fonts are more "readable" than san serif, and vice versa - so many, in fact, that I have grown to appreciate the ability to choose your own font preferences from within your browser. If we make a hard-coded font change in our LMS, that will throw people off. They might discover how to change the fonts displayed in Firefox and Chrome. Even better than that, let's put out an info piece on how an individual user can easily select an user account-level Moodle theme for their own viewing preference and needs:


I personally fall into the preference for serif for body copy, and sans-serif for small text for both digital and print, but not in a hard-and-fast way. I think the conclusion statement in this interesting piece says it perfectly:

"The best font choices are ones where readers do not notice the font, but the message."

Tuesday, January 20, 2015

Moodle 2.7 LTS Release Highlights

Learn about theme changes in Moodle 2.7, including the new customizable 'More' theme. See other new features and improvements in Moodle 2.7 here.

Check out this great YouTube video playlist for a great overview of the new features in Moodle 2.7.

Monday, January 19, 2015

Build a New Model

Ok, we have built a new model of effective and efficient face-to-face, online, and hybrid education. What's our next step toward greater adoption, Mr. Fuller?


Tuesday, December 16, 2014

Apps & Extensions #1

Best Study Apps, Tools, Tips, & Techniques

From OpenColleges (you will like the interactivity on that page)


"Although productivity apps can certainly be useful in many cases, keep in mind that it is possible to have too much of a good thing. Choose your apps carefully and make sure that each one will actually help you rather than serve as yet another distraction."

How to be Effective when Studying – Best Study Apps, Tools, Tips & Techniques by Open Colleges

The Educational Technology Pedagogy Wheel

These thoughts really jumped out at me in this article, so much so that I just had to pass it along:
-------

Many of the failures in #edtech are failures in #edtech integration… Seeing the pieces–tablets, apps, learning goals, cognitive actions, etc.–and how they work together is everything. Without that vision, any bit of #edtech is limp and lifeless.

An example?

Google Drive in and of itself is neither good nor bad.

Google Drive in service of a task previously unattainable without it, attended to by an engaged student, where said student is using a spreadsheet to classify mammal behavior with a student in another school as part of a presentation to a local wildlife preserve as the culminating task in a project-based learning unit on animal ecology?

That’s something else altogether.
-------
Let's fight the urge to reflexively assume that educational technology is usually or mostly just about getting to tinker with cool apps and gizmos. Maybe an occasional tool could take the learning and retention in your course to a whole new level, if you just give it a chance. Be the lifelong learner you encourage your students to be by setting the example and exploring new ways to implement technology toward their learning, retention, and overall success… like those who taught you did.

Monday, December 15, 2014

The Future of Gmail?

PSST: Want sneak peek of Gmail's future?


Ok, it's not confirmed that Gmail will inherit Inbox's interface, but it is interesting to imagine, huh?

Monday, December 8, 2014

LBCC Moodle Course Auto-Enroll Procedures

We tell instructors that it only takes a minute or two to enable auto-enrollment for their Moodle course(s), and here is how you can make that true for yourself (so you might want to bookmark this page).

All you have to do to enable Auto-Enrollment for your students is go to your course shell settings area…


… and input your CRN in the "CRN" field. Make sure there are only 5 digits in that field, and that it's the correct CRN:


Make sure to save changes at the bottom!

That's it - within about an hour or less, all students registered for your CRN(s) will be enrolled in your Moodle course!

IMPORTANT: If you are enrolling more than one CRN (section) into a single Moodle course shell, you need to 
input ONLY the lowest-numerical CRN in your Moodle course settings, and input each CRN into the Multiple-Enrollment CRN form (it simply ties all of the CRNs together for auto-enrollment purposes). Just like you tell your students, be sure to read and follow the instructions carefully!

NOTE: Setting up Auto-Enroll in your Moodle course is separate from making the course available to students. Don't forget to make your course available to them when you are ready!