by Dave Nagel
Google Apps Education Edition is coming to an open source learning management system near you. Moodlerooms, a Moodle partner, is launching a new enhancement to the open source LMS in collaboration with search giant Google to provide access to the application suite using a single sign-on.
Google Apps Education Edition is the widely deployed hosted application suite that includes communications tools like as Gmail, Google Calendar, and Google Talk; collaboration apps, such as Google Docs, Google Sites, and Google Labs (for software code review); and various administration features and APIs for integration with existing systems.
Through the integration, users loaded into Moodle will be automatically loaded into Google Apps Education Edition, "providing users with Web-based e-mail, document authoring, spreadsheets, presentations and sites, all integrated with their online learning platform," explained Moodlerooms' West Coast Managing Director Michael Penney. "This greatly simplifies the task of implementing a collaborative suite, as well as enables institutions to leverage the work they've already done integrating their platforms with their other systems. From a teacher's perspective, this provides an easy way to assign students to collaborative tasks without having to worry about the students having different operating systems or incompatible software or being unable to access an online system. From an IT staffer or CIO's perspective, this provides an integration tested with large-scale data loads and built on industry standard SAML 2.0 and OAuth protocols for secure single sign on and information transfer."
Google provided funding, direction, guidelines, and certain technologies for the solution, while Moodlerooms handled the coding, according to a Moodlerooms spokesperson.
Two educational organizations are piloting the program before it will be released publicly: Project KNOTtT, a group consisting of universities and colleges from Kansas, Nevada, Ohio, and Texas, and Centro Latino, an adult education organization that provides Spanish-language courses.
Read more here.
Showing posts sorted by relevance for query google. Sort by date Show all posts
Showing posts sorted by relevance for query google. Sort by date Show all posts
Friday, February 20, 2009
Friday, October 11, 2013
Moodle Written Assignment Submissions Via Google Docs
Here is how to share an assignment worksheet in a way that Students will be able to view, make a copy for themselves to edit, and submit it for a written assignment without printing a single page - your students will appreciate that! Feel free to offer suggestions for improving this tutorial by commenting below.
Phase 1 - Check Your Google Drive Upload Settings
Step 1: Trust me on this one, ok?
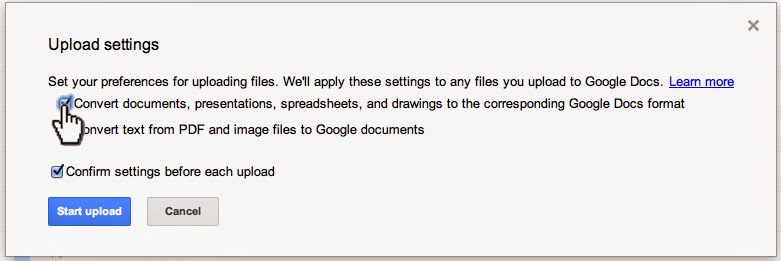
Step 2: In Google Drive, click the Settings gear in the upper right and adjust your Upload settings to "Confirm setting before each upload."

It may not seem obvious at first, but trust me - there will be times when you want to convert files, and times you don't. This setting has saved me from… well, just trust me on this.
Phase 2 - Prepping Your Google Doc
Step 1: Upload your worksheet to your Google Drive (or copy and paste it into a new Google Doc).
Step 2: Click the blue “Share” button in the upper right.

Step 3: Click the “Change…” link to the right of “Private - Only the people listed below can access”

Step 4: Decide on an appropriate sharing setting (pay attention to the help text below each setting), and click “Save” at the bottom left.

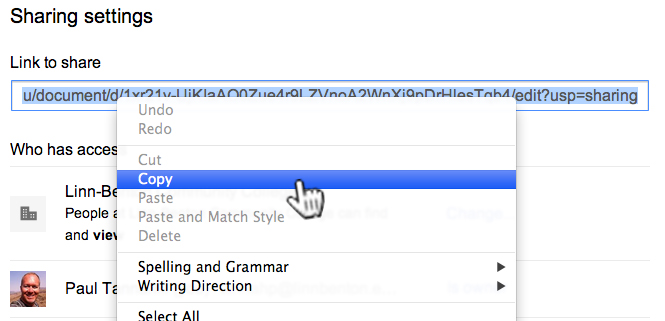
Step 5: Copy the link in the “Link to share” field. This is the link you will paste in the Moodle Assignment “Description” field for your Students to click to access the worksheet.
Phase 3 - Building Your Moodle Assignment
Instructor: copy & paste the below instructions into your Moodle Assignment “Description” field. Be sure to add the hyperlink in Step 2 below to the published version of your Google Doc starter worksheet (if any).
Step 1: Log into your LBCC RoadRunner acount.
Step 2: Click here to view the worksheet for this assignment. This will open in a new browser tab in Google Docs.
Step 3: File menu > Make a copy…
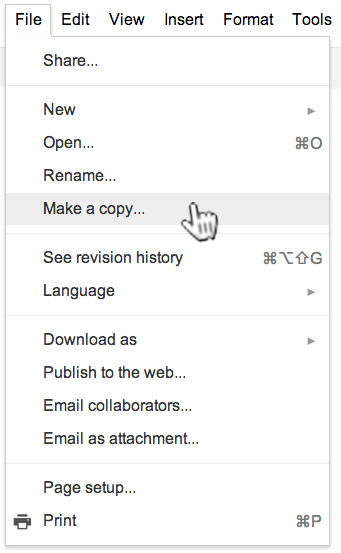
This will save a copy of the Google Doc that you own, and can edit.
Step 4: (Instructor: Depending on your preferences, and your Assignment “Online text” and “File submissions” settings, choose one of the following suggested instructions, and edit to your liking);
Edit the Google Doc, using bold and red font for clarity when I grade your work. Once you are finished, submit in the Moodle Assignment by copying and pasting the entire doc contents into the submission box.
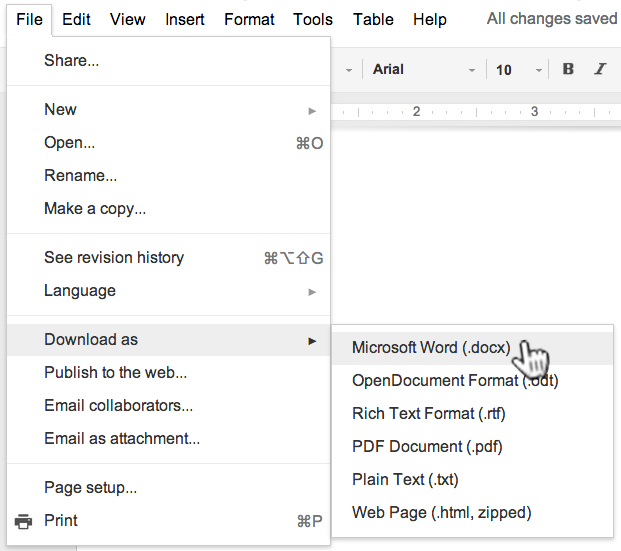
Download the Google Doc as a Word file (File > Download as > Microsoft Word (docx):
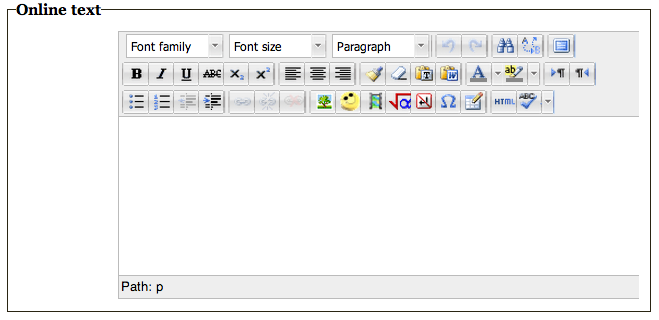
Depending on how your instructor has set the assignment submission settings, paste the text from the Word doc via the “Online text” area:
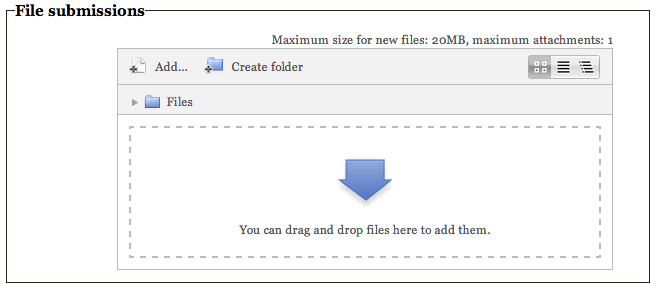
and/or upload the File here:
Be sure to click the “Saved changes” button at the bottom:

IMPORTANT:
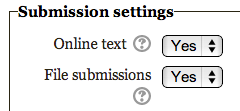
The above two submission options require the proper Submission settings in your Assignment “Settings” area:
You can test the assignment by enrolling and logging into one of the test student accounts in your course.
Wednesday, April 10, 2013
A Use for (the Other) Google Drive!
I received an email from one of my favorite instructors, Dr. Stefan Seiter:
"Is there a way to load a document from the web (e.g. a pdf file) directly to a particular folder in my Google drive or is it always a 2 step process: download to the computer and then transfer it to the Google Drive?"
Leave
it to Dr. Seiter to stretch my thinking! I had been of the impression
there is little use for the Google Drive software you can install on your computer to put
a copy of all of the files in your Google Drive on your hard drive, to sync with your Google Drive in the cloud, but that would do exactly what he was asking about. My reply:
"If you install Google Drive on your computer, Stefan, you could right-click on any link on a web page representing a file, and send that file right into your Google Drive. Make sense?"

There is Google Drive, and there is the "other" Google Drive. Your mission, should you choose to accept it, is to determine for yourself the value of each, and USE IT!
Tuesday, September 30, 2014
Create & Submit A Writing Assignment for Moodle Via Google Docs, Spreadsheets & Presentations
PSST: Guess what? Unless you are taking a class on a Microsoft Office product (Word, Excel, PowerPoint), you probably don't need Microsoft Office (that goes for real life, too). Do you have a writing assignment to turn in? Here's how to do it in Google Docs, without printing a single page (with one exception):
First, if you are just starting to use Google Drive, Check your Google Drive Upload Settings. You will be creating a doc, not uploading a file in this tutorial, but this will be handy for when you start uploading files into your Google Drive.
Step #1: When you are logged in to your LBCC Email, click the nine tiny squares in the upper right, and then click on the "Drive" icon:

Step #2: Click the red "New" button in the upper left, then click "Google Docs"

A new browser tab will open with your new doc ready to go.
Step #3: Click where you see "Untitled document" in the upper left:


PAPER SUBMISSION: If your instructor has set up your assignment to require a hard copy, you can print it out and hand it in. You've done this before. You know what to do:

First, if you are just starting to use Google Drive, Check your Google Drive Upload Settings. You will be creating a doc, not uploading a file in this tutorial, but this will be handy for when you start uploading files into your Google Drive.
Step #1: When you are logged in to your LBCC Email, click the nine tiny squares in the upper right, and then click on the "Drive" icon:
Step #2: Click the red "New" button in the upper left, then click "Google Docs"
Step #3: Click where you see "Untitled document" in the upper left:
Give your doc a name that makes sense:
Step #4: Your instructor may choose among a variety of assignment submission procedures:
TEXT INPUT: If your instructor has set up your assignment to require text input, you can select and copy all of the text from your Google Doc, and paste it into the Moodle assignment text input box.
FILE SUBMISSION: If your instructor has set up your assignment to require a file upload, you can download your Google Doc into the required file type, and upload it into the Moodle assignment:
GOOGLE DOC SHARE: If your instructor has set up your assignment to require you share your submission with them via Google Drive, you can do so via the blue "Share" button in the upper right:
Click in the "Invite people" field and start typing your instructor's name. Be sure to indicate their staff account (@linnbenton.edu), and not their student account (@mail.linnbenton.edu):
Indicate their sharing privilege setting (most likely "Can comment"), and then click the blue "Send" button:
Step #5: Be sure to follow any additional instructions in the Moodle assignment to finalize your assignment submission.
Wednesday, August 27, 2014
Publishing a Slideshow Presentation in Moodle
So you want to publish your awesome PowerPoint or Keynote presentation in your Moodle course? Guess what concept gave birth to Google Apps for Education here at Linn-Benton Community College? This one!
We handle publishing of Google Docs and Google Presentations in Moodle courses differently. We publish Docs by linking to them (see how here), and Presentations by embedding them in a Moodle page within your course shell. Here's the step-by-step:
1. Open your Moodle course in one browser tab, and Google Drive in another tab.
2. If you already have the presentation you wish to publish in your Google Drive, skip to step #4; otherwise, click the red "Upload" button, and browse for the file you need:

3. Make sure conversion is turned on (note: see how to set your Google Drive conversion settings here):


We handle publishing of Google Docs and Google Presentations in Moodle courses differently. We publish Docs by linking to them (see how here), and Presentations by embedding them in a Moodle page within your course shell. Here's the step-by-step:
1. Open your Moodle course in one browser tab, and Google Drive in another tab.
2. If you already have the presentation you wish to publish in your Google Drive, skip to step #4; otherwise, click the red "Upload" button, and browse for the file you need:
3. Make sure conversion is turned on (note: see how to set your Google Drive conversion settings here):
4. When you are in the editing interface for your Google Presentation, click File > Publish to the Web…
5. You will have a couple of confirmations to click through. Start publishing:
Are you sure (yes, of course I'm sure!):
6. You will get a dialog box that lets you configure the size of the presentation you are about to embed in your Moodle course. Choose "Small" presentation size, so that users on small monitors (think netbooks, etc.) won't have to scroll left and right to view your presentation. They can always choose to view it full screen:
7. Click in the "Embed code" field and copy it to the clipboard:
8. Now go to your Moodle course (that other browser tab), and make sure editing is turned on:
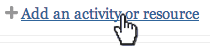
9. Click the "Add an Activity or resource" link in the content block where you want the link to appear (of course, you can always move it later):
10. Select "Page" near the bottom of the left pane:
11. Input in the "Name" and "Description" fields:
12. You may need to click the Toolbar Toggle…
… to get the "Edit HTML source" button visible to click:
13. This makes the HTML source editor dialog box appear. Paste the HTML from the Google Presentation (from step #7 above) into the input box, and click the "Update" button:
14. Click either the "Save and Return to Course" or "Save and Display" button at the bottom.
That's all there is to it. You don't need to redo the above steps if and when you want to edit your presentation; just access it in Google Drive and you're done - it's published and embedded in Moodle (and elsewhere, if you choose), so it's a live document to which your students will have one-click access, without needing anything more than a modern web browser. Cool, huh?
Comment below, and MOODLE ON.
Wednesday, April 22, 2015
Uploading a Word Document into Google Docs
If you haven't used Google Drive at all, or very much, do yourself a favor and get set up to use all of the doc sharing and editing features by configuring your Google Drive Upload Settings first.
When I mention the editing features of Google Docs, I realize that's one of those things that's easier to understand from practice, rather than reading. Let it suffice to say that, unless you are using more advanced features of Microsoft Office (Word, Excel, and PowerPoint), there is a strong chance you can do without those tools once and for all. I have had almost zero use in my personal and professional work for many years now.
So you want to learn how to upload a Word Doc (or, for that matter, an Excel or PowerPoint file) in your Google Drive? It's really easy. First, log into your Google Apps for Education account (that's your LBCC Gmail account). Next, look for the nine little squares (I call it the "Rubic's Cube) in the upper right, and then the "Drive" icon:

A new browser tab opens showing your Google Drive. If you see a prompt across the top of the page offering to "install" Google Drive onto your computer, you can close that out. You most likely won't need or want that, especially if you are working on a desktop machine that's always connected to the Internet.
Ready to upload your first Word Doc? Not so fast: it's probably a good idea to set up some basic folders first. Click the red "New" button in the upper left:

Go ahead and create a few folders, so you can start off being organized… or just jump right in like I did, and organize later.
Ready to upload your first Word Doc? Ok, click the red "New" button again, and then click "File Upload."

If you adjusted your Upload Settings (see the top of this post), your Word Doc will be uploaded, and converted to an editable Google Doc format on-the-fly. Double-click on the Doc to edit it, share it, publish it, etc. Welcome to a higher level of functionality in your document workflow!
When I mention the editing features of Google Docs, I realize that's one of those things that's easier to understand from practice, rather than reading. Let it suffice to say that, unless you are using more advanced features of Microsoft Office (Word, Excel, and PowerPoint), there is a strong chance you can do without those tools once and for all. I have had almost zero use in my personal and professional work for many years now.
So you want to learn how to upload a Word Doc (or, for that matter, an Excel or PowerPoint file) in your Google Drive? It's really easy. First, log into your Google Apps for Education account (that's your LBCC Gmail account). Next, look for the nine little squares (I call it the "Rubic's Cube) in the upper right, and then the "Drive" icon:
Ready to upload your first Word Doc? Not so fast: it's probably a good idea to set up some basic folders first. Click the red "New" button in the upper left:
Go ahead and create a few folders, so you can start off being organized… or just jump right in like I did, and organize later.
Ready to upload your first Word Doc? Ok, click the red "New" button again, and then click "File Upload."
If you adjusted your Upload Settings (see the top of this post), your Word Doc will be uploaded, and converted to an editable Google Doc format on-the-fly. Double-click on the Doc to edit it, share it, publish it, etc. Welcome to a higher level of functionality in your document workflow!
Friday, September 19, 2014
How to Embed a Google Doc in Moodle
By Miranda Dudzik:
When you publish a Google doc, you can either link it to your Moodle course, or embed it directly in a page.
Step 1: Navigate to your Moodle course.
- If you have not done so already, navigate to your published Google doc and copy the embed code that appears in the “Publish to the web...” window

- Navigate to your course and turn editing on:

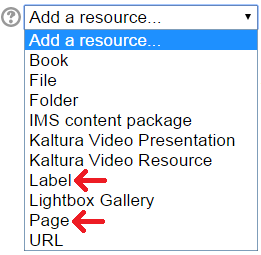
- You can either embed the document in a content section on the main course page as a new label, or in a new page. Navigate to the content section where you want the document or new page to appear, and click “Add a resource...” to access the pull-down menu. Select the option you want.
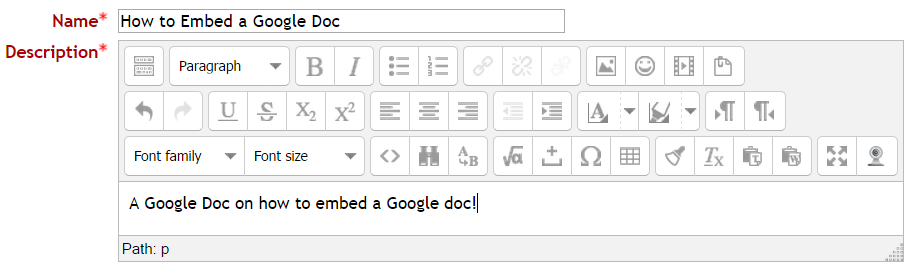
Step 2: Name the new resource.
- In the “Adding a new resource” page that opens, name your resource. If you are creating a new page, you will also need to add a description.
Step 3: Open the HTML source editor.
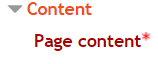
- If adding a label, there is only one text editor that appears. If adding a new page, scroll to the text editor in the Content section.
- Expand the editing toolbar (if it is not expanded already), by clicking on the Toolbar toggle icon in the top left corner of the text editor. The expanded editing toolbar is shown in the image below.
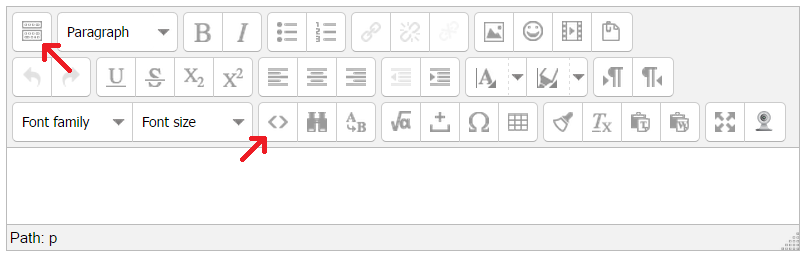
- To open the HTML source editor, click the HTML source icon.
(see image above).
Step 4: Paste embed code into HTML source editor.
- The image above is what your HTML embed code should look like, the only difference being the actual URL for your Google doc.
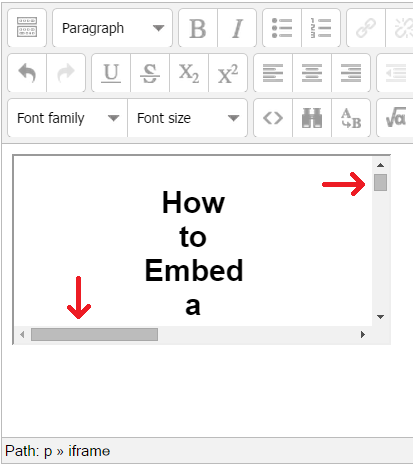
- Click “Update” to close the HTML source editor. You should notice that the Google doc is now displayed in the text editor, however, it is relatively small, and depending on the size of your document, there are scroll bars to the side and bottom of the frame window.
Step 5: Customize the size of the display frame.
- In order to enlarge the display frame and expand the view of the document, you need to add a snippet of code into the embed code that you just pasted in that will define the width and height of the display frame. That snippet is:
width="560" height="315"
The numbers in this snippet of code define the dimensions of the display frame. You can change these numbers to fit your desired size, as long as you do not change anything else in the piece of code.
This snippet must be added in directly after “<iframe” in your original source code, and right before “src=...”.
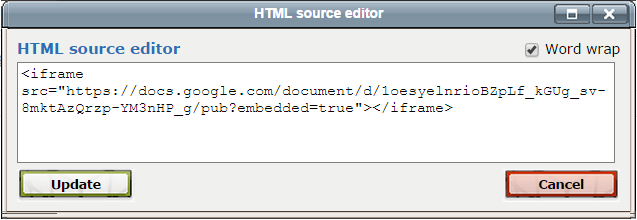
- For example, if your embed source code is :
<iframe src="https://docs.google.com/document/d/1oesyelnrioBZpLf_kGUg_sv-8mktAzQrzp-YM3nHP_g/pub?embedded=true"></iframe>
The snippet gets added like this (red font is only for demonstration purposes):
<iframe width="560" height="315" src="https://docs.google.com/document/d/1oesyelnrioBZpLf_kGUg_sv-8mktAzQrzp-YM3nHP_g/pub?embedded=true"></iframe>
- Reopen the HTML source editor and add the snippet of code as demonstrated above.

- Click “Update”. Your new display frame should look similar to this:
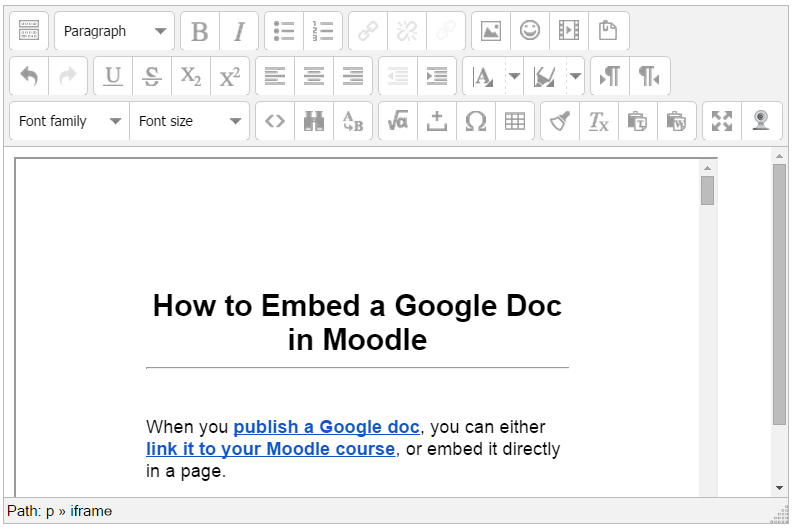
The scroll bars are still there, but the frame is much larger. You can adjust the numbers in the code snippet to make it bigger or smaller to fit your needs. The larger the numbers, the larger the display frame.
NOTE: You can use these instructions to embed Google docs in other places than just labels and pages. This technique also works in pages that you add to Lesson and Book activities as well.
Use caution when determining the size of your frame, if you make it too large it might display poorly in the page you put it in. Also keep in mind that large embedded files can be problematic for Moodlers who have small computer screens or who use mobile devices.
Subscribe to:
Posts (Atom)