Tuesday, September 30, 2014

Create & Submit A Writing Assignment for Moodle Via Google Docs, Spreadsheets & Presentations

PSST: Guess what? Unless you are taking a class on a Microsoft Office product (Word, Excel, PowerPoint), you probably don't need Microsoft Office (that goes for real life, too). Do you have a writing assignment to turn in? Here's how to do it in Google Docs, without printing a single page (with one exception):

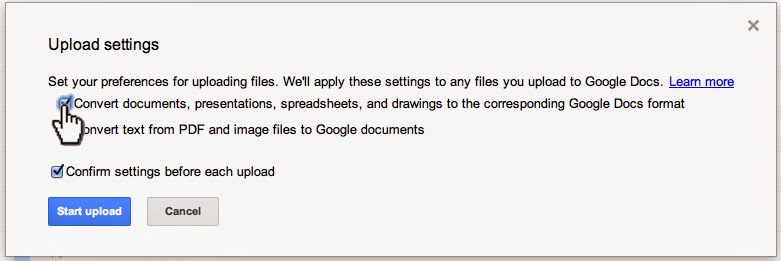
First, if you are just starting to use Google Drive, Check your Google Drive Upload Settings. You  will be creating a doc, not uploading a file in this tutorial, but this will be handy for when you start uploading files into your Google Drive.


Step #1: When you are logged in to your LBCC Email, click the nine tiny squares in the upper right, and then click on the "Drive" icon:


Step #2: Click the red "New" button in the upper left, then click "Google Docs"


A new browser tab will open with your new doc ready to go. 

Step #3: Click where you see "Untitled document" in the upper left:


Give your doc a name that makes sense:


Step #4: Your instructor may choose among a variety of assignment submission procedures:

TEXT INPUT: If your instructor has set up your assignment to require text input, you can select and copy all of the text from your Google Doc, and paste it into the Moodle assignment text input box.

FILE SUBMISSION: If your instructor has set up your assignment to require a file upload, you can download your Google Doc into the required file type, and upload it into the Moodle assignment:


GOOGLE DOC SHARE: If your instructor has set up your assignment to require you share your submission with them via Google Drive, you can do so via the blue "Share" button in the upper right:


Click in the "Invite people" field and start typing your instructor's name. Be sure to indicate their staff account (@linnbenton.edu), and not their student account (@mail.linnbenton.edu):


Indicate their sharing privilege setting (most likely "Can comment"), and then click the blue "Send" button:


PAPER SUBMISSION: If your instructor has set up your assignment to require a hard copy, you can print it out and hand it in. You've done this before. You know what to do:


Step #5: Be sure to follow any additional instructions in the Moodle assignment to finalize your assignment submission.

Friday, September 26, 2014

Troubleshooting Auto-Enrollment in Your Moodle Course

"Help! My Moodle course has no students!" We hear it a lot just before and after a new term begins. Luckily, we have a simple 2-step process to enable auto-enrollment for your Moodle course(s), as well as a simple troubleshooting process:


1. Click on the settings gear in the upper right to go to your course settings area:


2. Verify you have input your CRN in the "CRN" field. Make sure there are only 5 digits in that field, and that it's the correct CRN:


3. If you see the proper CRN in the "CRN" field (see above), that possibly means there is an invisible character(s) in addition to the 5 digits. This sometimes happens if you have copied the CRN from WebRunner. Remove anything other than the 5 characters, click the blue "Save and display" button at the bottom, and your Moodle course will be auto-enrolled at or shortly after the top of the next hour!


NOTE: If you are enrolling more than one CRN (section) into a single Moodle course shell, you need to input each CRN into the above CRN form individually (one at a time), as well as input all of those CRNs into the Multiple-Enrollment CRN form (it simply ties all of the CRNs together for auto-enrollment purposes). Just like you tell your students, be sure to read and follow the instructions carefully!

Thursday, September 25, 2014

Make Your Moodle Course Available to Students!

If you have enabled Auto-Enroll in your Moodle course, and you have verified your students are enrolled in your course, but your students still can't access your course, the issue is probably that your course is unavailable to students:

1. Click on the settings gear in the upper right to go to your course settings area:


2. Make your course available to students:


3. Click "Save changes on the bottom:


Friday, September 19, 2014

How to Embed a Google Doc in Moodle


By Miranda Dudzik:


When you publish a Google doc, you can either link it to your Moodle course, or embed it directly in a page.  


Step 1: Navigate to your Moodle course.


  • If you have not done so already, navigate to your published Google doc and copy the embed code that appears in the “Publish to the web...” window


Get Embed Code to the Published Doc.png


  • Navigate to your course and turn editing on:


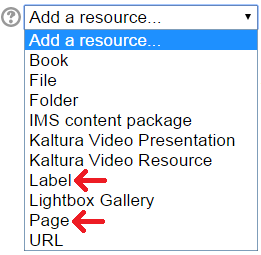
  • You can either embed the document in a content section on the main course page as a new label, or in a new page. Navigate to the content section where you want the document or new page to appear, and click “Add a resource...” to access the pull-down menu. Select the option you want.


Add a Label or Page.png


Step 2: Name the new resource.


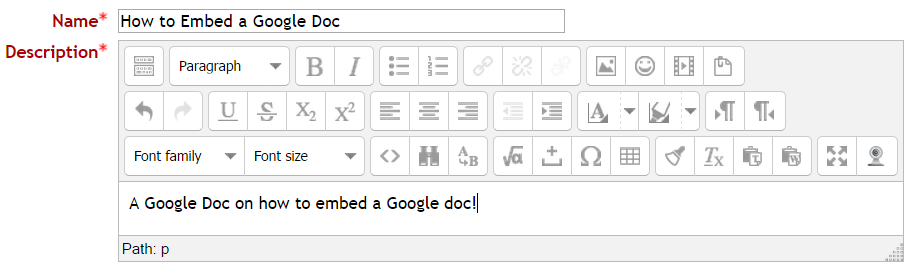
  • In the “Adding a new resource” page that opens, name your resource. If you are creating a new page, you will also need to add a description.


Adding a New Page.png


Step 3: Open the HTML source editor.


  • If adding a label, there is only one text editor that appears. If adding a new page, scroll to the text editor in the Content section.


Page Content Section.png


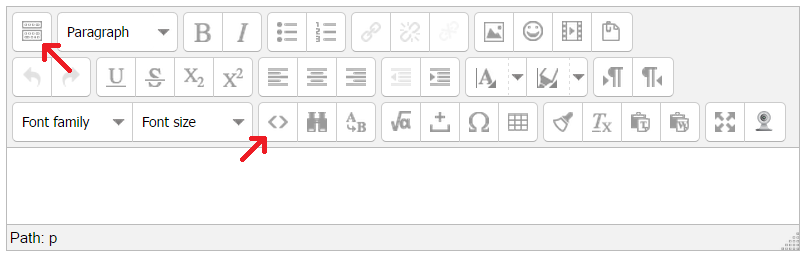
  • Expand the editing toolbar (if it is not expanded already),  by clicking on the Toolbar toggle icon in the top left corner of the text editor. The expanded editing toolbar is shown in the image below.


Text Editor.png


  • To open the HTML source editor, click the HTML source icon. HTML Source Icon.png (see image above).


Step 4: Paste embed code into HTML source editor.
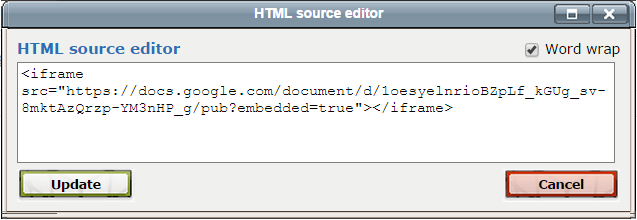
HTML Source Editor.png


  • The image above is what your HTML embed code should look like, the only difference being the actual URL for your Google doc.


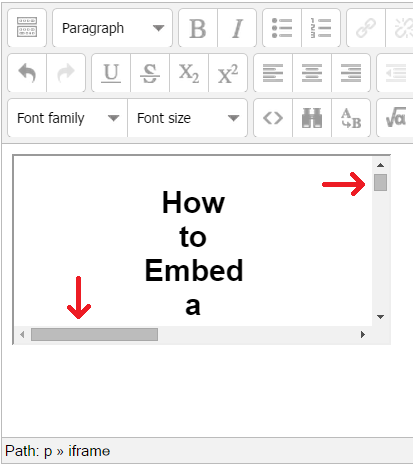
  • Click “Update” to close the HTML source editor. You should notice that the Google doc is now displayed in the text editor, however, it is relatively small, and depending on the size of your document, there are scroll bars to the side and bottom of the frame window.


Embedded Google Doc.png


Step 5: Customize the size of the display frame.


  • In order to enlarge the display frame and expand the view of the document, you need to add a snippet of code into the embed code that you just pasted in that will define the width and height of the display frame. That snippet is:


width="560" height="315"


The numbers in this snippet of code define the dimensions of the display frame. You can change these numbers to fit your desired size, as long as you do not change anything else in the piece of code.


This snippet must be added in directly after “<iframe” in your original source code, and right before “src=...”.


  • For example, if your embed source code is :


<iframe src="https://docs.google.com/document/d/1oesyelnrioBZpLf_kGUg_sv-8mktAzQrzp-YM3nHP_g/pub?embedded=true"></iframe>


The snippet gets added like this (red font is only for demonstration purposes):


<iframe width="560" height="315" src="https://docs.google.com/document/d/1oesyelnrioBZpLf_kGUg_sv-8mktAzQrzp-YM3nHP_g/pub?embedded=true"></iframe>


  • Reopen the HTML source editor and add the snippet of code as demonstrated above.


HTML Source Editor.png
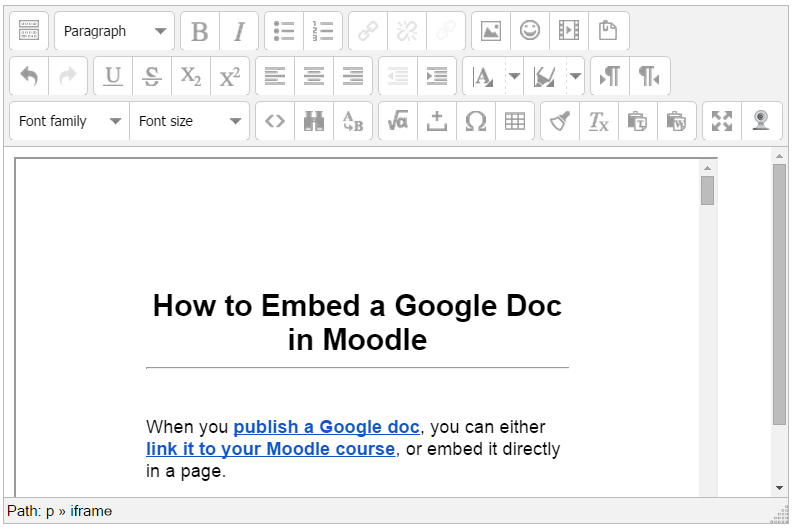
  • Click “Update”. Your new display frame should look similar to this:


Enlarged Display Frame.png


The scroll bars are still there, but the frame is much larger. You can adjust the numbers in the code snippet to make it bigger or smaller to fit your needs.  The larger the numbers, the larger the display frame.


NOTE: You can use these instructions to embed Google docs in other places than just labels and pages. This technique also works in pages that you add to Lesson and Book activities as well.


Use caution when determining the size of your frame, if you make it too large it might display poorly in the page you put it in. Also keep in mind that large embedded files can be problematic for Moodlers who have small computer screens or who use mobile devices.


Tuesday, September 9, 2014

How to Publish a Google Doc in a Moodle Course

One of the best ways to publish eLearning content is via Google Docs, rather than as a page within your LMS (Learning Management System). This will allow you to keep all of your course content in one place (Google Drive), from which you can edit with no need to republish.
Step 1: From within a Google Doc you wish to publish in your Moodle course, click File > Publish to the web… (NOTE: not the “File” menu for the browser itself):
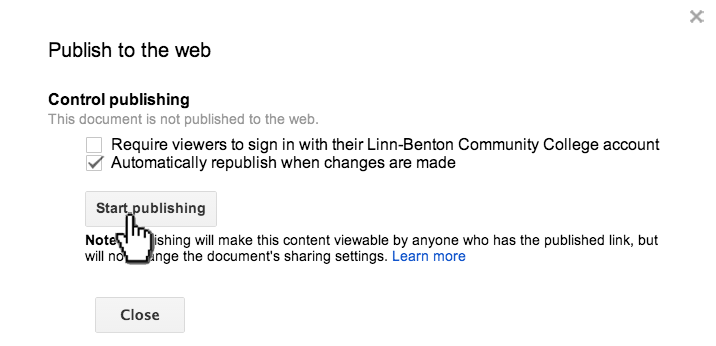
Step 2: In the “Publish to the web” dialog that appears, note the available checkboxes. We recommend leaving them both as-is. Click “Start publishing.”
Step 3: Click “OK.”
Step 4: In the “Publish to the web” dialog, click in the “Document link” field and copy the link to the clipboard.
Step 5: In your Moodle course, turn editing on:
and click  in the content block where you wish the link to appear.
Step 6: In the “Add an activity or resource” dialog box, select “URL,” then click the “Add” button:
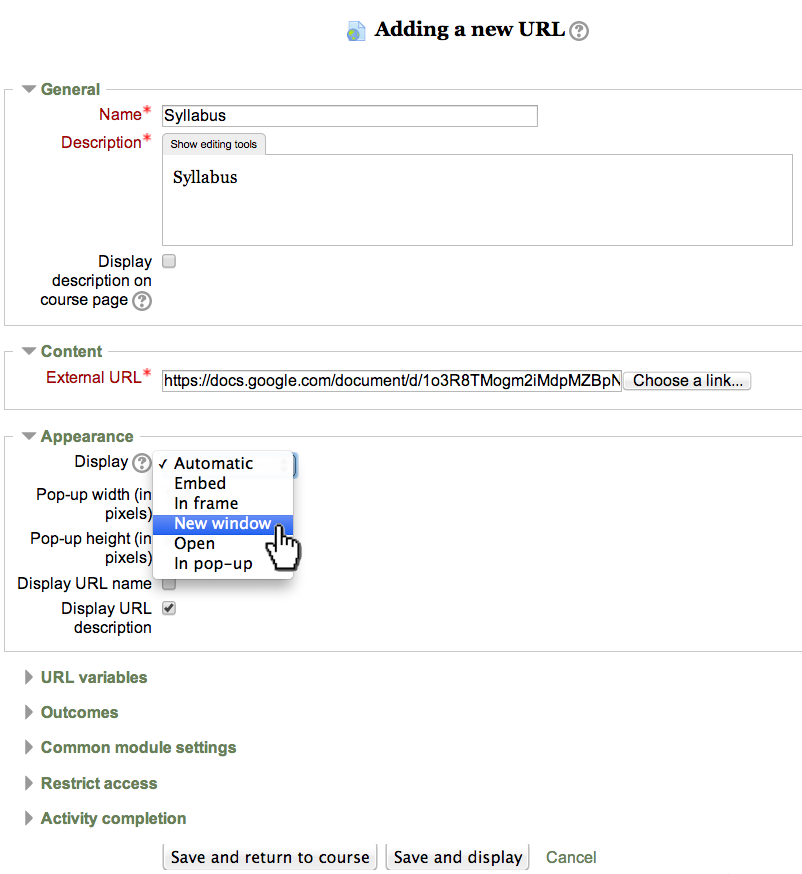
Step 7: This is the “Adding a new URL” page. Note that the field with asterisks are required. Also, we recommend indicating the link to appear in a new browser window. Make your inputs and selections, and click the “Save and return to course” button at the bottom.
Step 8: Locate your new link, and move it, if necessary (with the “” icon), then test it out by clicking the link. It should open in a new browser window or tab.
OPTIONAL: You can shorten the URL via bit.ly.

Wednesday, August 27, 2014

Publishing a Slideshow Presentation in Moodle

So you want to publish your awesome PowerPoint or Keynote presentation in your Moodle course? Guess what concept gave birth to Google Apps for Education here at Linn-Benton Community College? This one!


We handle publishing of Google Docs and Google Presentations in Moodle courses differently. We publish Docs by linking to them (see how here), and Presentations by embedding them in a Moodle page within your course shell. Here's the step-by-step:

1. Open your Moodle course in one browser tab, and Google Drive in another tab.

2. If you already have the presentation you wish to publish in your Google Drive, skip to step #4; otherwise, click the red "Upload" button, and browse for the file you need:


3. Make sure conversion is turned on (note: see how to set your Google Drive conversion settings here):


4. When you are in the editing interface for your Google Presentation, click File > Publish to the Web…


5. You will have a couple of confirmations to click through. Start publishing:


Are you sure (yes, of course I'm sure!):


6. You will get a dialog box that lets you configure the size of the presentation you are about to embed in your Moodle course. Choose "Small" presentation size, so that users on small monitors (think netbooks, etc.) won't have to scroll left and right to view your presentation. They can always choose to view it full screen:


7. Click in the "Embed code" field and copy it to the clipboard:


8. Now go to your Moodle course (that other browser tab), and make sure editing is turned on:

9. Click the "Add an Activity or resource" link in the content block where you want the link to appear (of course, you can always move it later):


10. Select "Page" near the bottom of the left pane:


11. Input in the "Name" and "Description" fields:


12. You may need to click the Toolbar Toggle…


… to get the "Edit HTML source" button visible to click:


13. This makes the HTML source editor dialog box appear. Paste the HTML from the Google Presentation (from step #7 above) into the input box, and click the "Update" button:


14. Click either the "Save and Return to Course" or "Save and Display" button at the bottom.


That's all there is to it. You don't need to redo the above steps if and when you want to edit your presentation; just access it in Google Drive and you're done - it's published and embedded in Moodle (and elsewhere, if you choose), so it's a live document to which your students will have one-click access, without needing anything more than a modern web browser. Cool, huh?

Comment below, and MOODLE ON.

Tuesday, August 19, 2014

YIPEE - Another Google Apps Interface Change!

What does this mean?
Hopefully that Google is one step ahead of the rest of us, like they usually are when they make a sweeping change. Sometimes, though, it just doesn't seem that way…

Thursday, July 31, 2014

Importing Test Questions Into Moodle

We are often asked by instructors, "How do I import my test questions into Moodle?"

One easy method is to use a text‐based editor to compose test questions that can be easily imported into Moodle. Proper syntax and file structure is critical for a successful file upload. We have developed two basic processes to quickly and efficiently import question banks into your Moodle shell:

For  true/false and multiple choice questions, we recommend the "Aiken" format. It is simple, easy, and fast. You can do it yourself! Read more here.

For question types beyond true/false and multiple choice (matching, multiple response, fill-in-the-blank, etc.), we utilize a tool called Respondus (don't buy it; we have it). If you deliver a Microsoft Word file in the proper syntax to us, we can take it from there. Read more here. Be sure to include:


  1. Properly-formatted Word file
  2. Link to your Moodle course shell
  3. Question categories ("Chapter 1," "Week 1," or other naming conventions)
  4. Whether you also want quizzes created as we upload your questions (including default settings)


Please get this information to us with as much lead time before a term begins as possible, because we are heavily involved with student access support work during the week before, and the first two weeks of each term.

Tuesday, July 22, 2014

Low Digital Fluency of Faculty

From the 2014 NMC Horizon Report: 2014 Higher Education Edition (pp 22-23):

"Faculty training still does not acknowledge the fact that digital media literacy continues its rise in importance as a key skill in every discipline and profession. Despite the widespread agreement on the importance of digital media literacy, training in the supporting skills and techniques is rare in teacher education and non-existent in the preparation of faculty. As lecturers and professors begin to realize that they are limiting their students by not helping them to develop and use digital media literacy skills across the curriculum, the lack of formal training is being offset through professional development or informal learning, but we are far from seeing digital media literacy as a norm. This challenge is exacerbated by the fact that digital literacy is less about tools and more about thinking, and thus skills and standards based on tools and platforms have proven to be somewhat ephemeral."

Monday, June 30, 2014

The Beginner’s Guide To Google In The Classroom

I'm really happy to see that Oregon was the first state to offer Google Apps for Education in all K-12 classrooms, and that the college where I work was ahead of the curve.

Read more here.